Posts tagged with “remote”

More on WebDAV - Connecting a remote WebDAV folder in Windows

Written by Simone

After some failed attempt at this, I think I found the right way to "mount" a remote WebDAV folder under Windows' Explorer.

Initially my baby steps took me here: https://note.woodpeckersnest.space/share/0TJT81fgI8Jy

After following that tutorial I didn't succeed, so I investigated further. I can say that everythig looks correct until you get to point 9.

The address they tell you have to enter isn't correct in my experience and they aren't even using https for the URL. What worked for me was instead something like:

\\webdav.woodpeckersnest.space@SSL\folder

You have to input the network-path-stile address which is common in Windows, as in: double backslash, FQDN of your WebDAV server, "@SSL" and then the path (folder) where you have access to files in your WebDAV server, with a backslash preceding it.

That's it, a prompt will ask for username and password and then a new Network Path (WebFolder) will be connected in Explorer, just below your local drives.
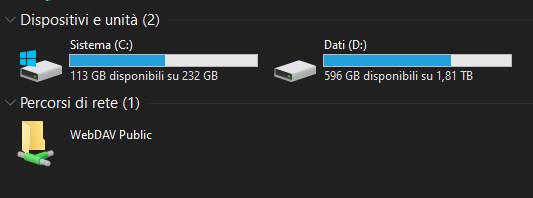
You can then browse, copy, upload, delete (and so on) whatever content you like.

EDIT: Just found out I couldn't rename files/folders from Windows or Total Commander (Android)

Fixed by setting nginx virtualhost like this:

server {
    listen 443 ssl http2;
    listen [::]:443 ssl http2;
    server_name  webdav.woodpeckersnest.space;


    # HTTPS configuration
    ssl_certificate /etc/letsencrypt/live/webdav.woodpeckersnest.space/fullchain.pem;
    ssl_certificate_key /etc/letsencrypt/live/webdav.woodpeckersnest.space/privkey.pem;

    access_log /var/log/nginx/webdav/access.log;
    error_log /var/log/nginx/webdav/error.log;

  location / {
    set $destination $http_destination;

    if ($destination ~* ^https(.+)$) {
         set $destination http$1;
    }

    proxy_set_header   Destination $destination;
    proxy_set_header   X-Real-IP $remote_addr;
    proxy_set_header   X-Forwarded-For $proxy_add_x_forwarded_for;
    proxy_set_header   Host $host;
    proxy_pass         http://127.0.0.1:17062/;
    proxy_http_version 1.1;
    proxy_set_header   Upgrade $http_upgrade;
    proxy_set_header   Connection "upgrade";
  }

  client_max_body_size 0;

}

Now I'm quite happy 😀

Wireguard IPv6

Written by Simone

Here's my configuration, working fine with my Android 9 Phone

server.conf

root@pandora:~# cat /etc/wireguard/wg0.conf
[Interface]
# specify generated private key for server
PrivateKey = <sekret>
# IP address for VPN interface
Address = 172.16.100.1/32, fd42:42:42::1/64
MTU = 1420
# UDP port WireGuard server listens
ListenPort = 51820

# possible to set any commands after WireGuard starts/stops
# set routing rules like follows to access to local network via VPN session
PostUp = iptables -A FORWARD -i wg0 -j ACCEPT; iptables -t nat -A POSTROUTING -o eth0 -j MASQUERADE; ip6tables -A FORWARD -i wg0 -j ACCEPT; ip6tables -t nat -A POSTROUTING -o eth0 -j MASQUERADE;
PostDown = iptables -D FORWARD -i wg0 -j ACCEPT; iptables -t nat -D POSTROUTING -o eth0 -j MASQUERADE; ip6tables -D FORWARD -i wg0 -j ACCEPT; ip6tables -t nat -D POSTROUTING -o eth0 -j MASQUERADE;

[Peer]
# REDMI
# specify public key for client
PublicKey = <sekret>
# clients' VPN IP addresses you allow to connect
# possible to specify subnet ⇒ [172.16.100.0/24]
AllowedIPs = 172.16.100.6/32, fd42:42:42::6/128
PersistentKeepalive = 25

client.conf

root@pandora:~# cat /etc/wireguard/redmi.conf
[Interface]
#Private IP Address
Address = fd42:42:42::6/128, 172.16.100.6/32
#Client's Private Key
PrivateKey = <sekret>
#Server's listening port
ListenPort = 51820

[Peer]
#Server's Public Key
PublicKey = <sekret>
AllowedIPs = ::0/0, 0.0.0.0/0
#Server's IP:port
Endpoint = woodpeckersnest.space:51820

sysctl.conf

root@pandora:~# sysctl -p
net.ipv4.ip_forward = 1
net.ipv6.conf.all.forwarding = 1
net.ipv6.conf.eth0.accept_ra = 2

MTPuTTY (Multi-Tabbed PuTTY)

Written by Simone

Nice little piece of software; free but not open source.

Use your saved PuTTY configs in a multi tabbed window! It's just easy like that, no fuss, no complicated setup but with added options, like saving your sessions when quitting the program, so that they'll run again at next startup; auto reconnection on connection loss, with a timer, a few themes for both light and dark setups and possibility to run scripts in any or all of your SSH sessions.

If I'd have to be picky, there's one thing which doesn't work: flashing window on bell, but maybe that's expected since it's just the main window with different tabs.. Well, I think it could be improved anyway.