Posts tagged with “Linux”

beszel

Written by Simone

Beszel Setup

Interesting project at https://github.com/henrygd/beszel

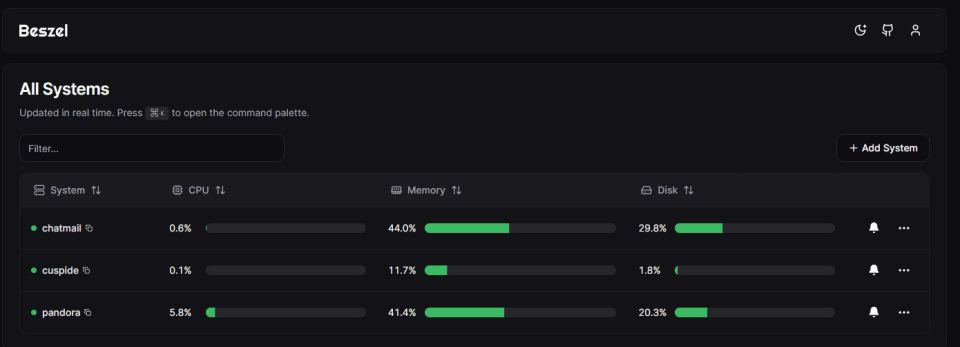
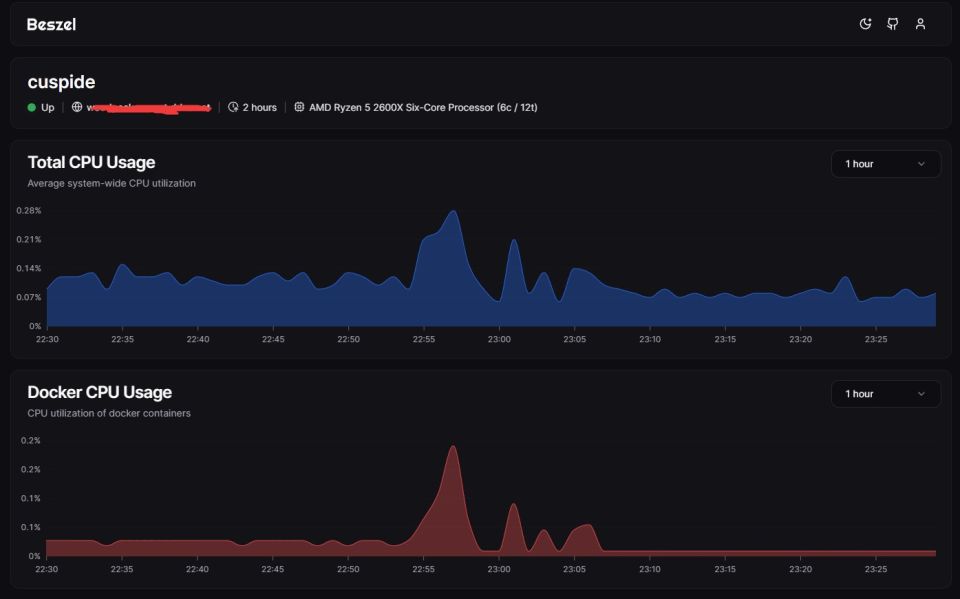
Collects resource statistics from one or more systems, display CPU/RAM/DISK/NET/DOCKER information and be alerted in case "event" happens.

These days I set up beszel HUB on my VPS and beszel-agent on the same VPS, on our chatmail server and even on my desktop PC at home on WSL2: so now I'm monitoring 3 systems from a web interface and I'm being notified if one of them becomes unreachable or has exceeded %resources for every type of monitor.

This is my compose.yaml for the HUB and agent on "woodpeckersnest.eu":

services:
  beszel:
    image: 'henrygd/beszel'
    container_name: 'beszel'
    networks:
      beszel:
        ipv4_address: 172.30.0.2
    restart: unless-stopped
    ports:
      - '8090:8090'
    volumes:
      - beszel_data:/beszel_data
    environment:
      DISABLE_PASSWORD_AUTH: false

  beszel-agent:
    image: "henrygd/beszel-agent"
    container_name: "beszel-agent"
    networks:
      beszel:
        ipv4_address: 172.30.0.3
    restart: unless-stopped
    volumes:
      - /var/run/docker.sock:/var/run/docker.sock:ro
    environment:
      PORT: 45876
      KEY: "SECRET"
      FILESYSTEM: /dev/sda3
      
networks:
  beszel:
    name: "beszel"
    external: true

volumes:
   beszel_data:
       external: true
       name: "beszel_data"

I created a named docker volume and a custom network beforehand:

docker volume create --name beszel_data

docker network create --subnet=172.30.0.0/16 --gateway=172.30.0.1 beszel

I didn't want to run the agent with network_mode: host, so here's a bridged setup. Network stats on my VPS won't be relevant, since the only net beszel can monitor is the docker bridged one, but I don't care very much.

For chatmail and home desktop I'm running the binary agent, respectively in a systemd unit for chatmail and with a bash script for my PC.

The systemd unit looks like this:

# /etc/systemd/system/beszel-agent.service
[Unit]
Description=Beszel Agent Service
After=network.target

[Service]
Environment="PORT=45876"
Environment="KEY=SECRET"
ExecStart=/home/chatmail/bin/beszel-agent
User=chatmail
Restart=always

[Install]
WantedBy=multi-user.target

The HUB has also got (automatic) backups, locally or on S3 - I tested both without issues. Beszel (both HUB and agent) take almost no CPU/RAM to do their job and stats are easy to read. Even the management tool is quite straightforward and has got the basic stuff right - I skipped OAUTH entirely though, while managing users manually.

Still young project but already recommended 😍

If you're interested in setting this up on WSL2, here I opened a discussion about this topic.. No need to repeat myself 😀

shout-out to "mforester@rollenspiel.social" who posted about beszel on the fediverse and gave me the idea to try it.

More on WebDAV - Connecting a remote WebDAV folder in Windows

Written by Simone

After some failed attempt at this, I think I found the right way to "mount" a remote WebDAV folder under Windows' Explorer.

Initially my baby steps took me here: https://note.woodpeckersnest.space/share/0TJT81fgI8Jy

After following that tutorial I didn't succeed, so I investigated further. I can say that everythig looks correct until you get to point 9.

The address they tell you have to enter isn't correct in my experience and they aren't even using https for the URL. What worked for me was instead something like:

\\webdav.woodpeckersnest.space@SSL\folder

You have to input the network-path-stile address which is common in Windows, as in: double backslash, FQDN of your WebDAV server, "@SSL" and then the path (folder) where you have access to files in your WebDAV server, with a backslash preceding it.

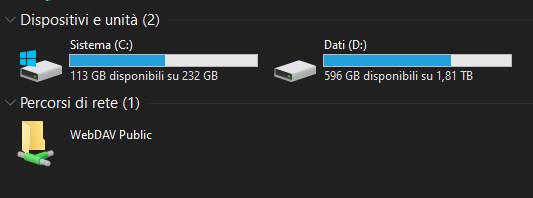
That's it, a prompt will ask for username and password and then a new Network Path (WebFolder) will be connected in Explorer, just below your local drives.

You can then browse, copy, upload, delete (and so on) whatever content you like.

EDIT: Just found out I couldn't rename files/folders from Windows or Total Commander (Android)

Fixed by setting nginx virtualhost like this:

server {
    listen 443 ssl http2;
    listen [::]:443 ssl http2;
    server_name  webdav.woodpeckersnest.space;


    # HTTPS configuration
    ssl_certificate /etc/letsencrypt/live/webdav.woodpeckersnest.space/fullchain.pem;
    ssl_certificate_key /etc/letsencrypt/live/webdav.woodpeckersnest.space/privkey.pem;

    access_log /var/log/nginx/webdav/access.log;
    error_log /var/log/nginx/webdav/error.log;

  location / {
    set $destination $http_destination;

    if ($destination ~* ^https(.+)$) {
         set $destination http$1;
    }

    proxy_set_header   Destination $destination;
    proxy_set_header   X-Real-IP $remote_addr;
    proxy_set_header   X-Forwarded-For $proxy_add_x_forwarded_for;
    proxy_set_header   Host $host;
    proxy_pass         http://127.0.0.1:17062/;
    proxy_http_version 1.1;
    proxy_set_header   Upgrade $http_upgrade;
    proxy_set_header   Connection "upgrade";
  }

  client_max_body_size 0;

}

Now I'm quite happy 😀

Notes

Written by Simone

I'll update this post whenever I see fits, A.K.A. when I have other bits of information which don't require a whole post.

Operations on files and directories

Move files and directories to the current/parent directory in Linux

Current dir

find . -type f -exec mv {} . \;

Parent dir

find . -type f -exec mv {} .. \;

Recursive chmod on files and dirs

To change all the directories to 755 (-rwxr-xr-x):

find /var/www/blog -type d -exec chmod 755 {} \;

To change all the files to 644 (-rw-r--r--):

find /var/www/blog -type f -exec chmod 644 {} \;

Certbot common commands

Register single domain:

certbot certonly --standalone -d domain.tld --dry-run

Renew single domain:

certbot renew --cert-name domain.tld --dry-run
  • Remove “–dry-run” when ok.

Revoke certificate:

certbot revoke --cert-path /etc/letsencrypt/archive/${YOUR_DOMAIN}/cert1.pem

Check certificate's expiry date:

cat /etc/letsencrypt/live/domain.tld/cert.pem | openssl x509 -noout -enddate

GIT

To reset your git repository to given commit id, do:

git reset --hard <commit-id>
git push origin master --force

Ignoring files that are already tracked

git update-index --assume-unchanged <your file here>

Delta Chat Mail sieve

require ["fileinto"];
# rule:[DeltaChat]
if header :contains "Chat-Version" "1.0"
{
	fileinto "DeltaChat";
	stop;
}

Postfix mail queue

To view postfix mail queue in case of problems and remove a particular message from it, do as follows:

# mailq

-Queue ID-  --Size-- ----Arrival Time---- -Sender/Recipient-------
6DCF32201B*    4824 Thu Oct 19 22:54:44  roughnecks@woodpeckersnest.eu
                                         debian@spacenet.it

-- 4 Kbytes in 1 Request.
# postsuper -d 6DCF32201B

postsuper: 6DCF32201B: removed
postsuper: Deleted: 1 message

To delete all emails in the queue, use this command:

# postsuper -d ALL

Check Preferred Outgoing IP (when multiple are set on <interface>)

curl ifconfig.me

The correct command to add a new Linux user (in this case without a shell)

adduser --shell /usr/sbin/nologin <username>

I always forget which command is the complete one, useradd or adduser

Wireguard IPv6

Written by Simone

Here's my configuration, working fine with my Android 9 Phone

server.conf

root@pandora:~# cat /etc/wireguard/wg0.conf
[Interface]
# specify generated private key for server
PrivateKey = <sekret>
# IP address for VPN interface
Address = 172.16.100.1/32, fd42:42:42::1/64
MTU = 1420
# UDP port WireGuard server listens
ListenPort = 51820

# possible to set any commands after WireGuard starts/stops
# set routing rules like follows to access to local network via VPN session
PostUp = iptables -A FORWARD -i wg0 -j ACCEPT; iptables -t nat -A POSTROUTING -o eth0 -j MASQUERADE; ip6tables -A FORWARD -i wg0 -j ACCEPT; ip6tables -t nat -A POSTROUTING -o eth0 -j MASQUERADE;
PostDown = iptables -D FORWARD -i wg0 -j ACCEPT; iptables -t nat -D POSTROUTING -o eth0 -j MASQUERADE; ip6tables -D FORWARD -i wg0 -j ACCEPT; ip6tables -t nat -D POSTROUTING -o eth0 -j MASQUERADE;

[Peer]
# REDMI
# specify public key for client
PublicKey = <sekret>
# clients' VPN IP addresses you allow to connect
# possible to specify subnet ⇒ [172.16.100.0/24]
AllowedIPs = 172.16.100.6/32, fd42:42:42::6/128
PersistentKeepalive = 25

client.conf

root@pandora:~# cat /etc/wireguard/redmi.conf
[Interface]
#Private IP Address
Address = fd42:42:42::6/128, 172.16.100.6/32
#Client's Private Key
PrivateKey = <sekret>
#Server's listening port
ListenPort = 51820

[Peer]
#Server's Public Key
PublicKey = <sekret>
AllowedIPs = ::0/0, 0.0.0.0/0
#Server's IP:port
Endpoint = woodpeckersnest.space:51820

sysctl.conf

root@pandora:~# sysctl -p
net.ipv4.ip_forward = 1
net.ipv6.conf.all.forwarding = 1
net.ipv6.conf.eth0.accept_ra = 2

Thunderbird Autoconfiguration

Written by Simone

Set up Thunderbird autoconfiguration for my lil mail server. Working good.

nginx config:

server {
        listen [::]:443 ssl http2;
        server_name woodpeckersnest.eu;

        ssl_certificate /etc/letsencrypt/live/woodpeckersnest.eu/fullchain.pem;
        ssl_certificate_key /etc/letsencrypt/live/woodpeckersnest.eu/privkey.pem;

        root /var/www/mail/;
        location / {
                try_files /.well-known/autoconfig/mail/config-v1.1.xml =404;
        }

    access_log /var/log/nginx/autoconfig.log;
    error_log /var/log/nginx/autoconfig_error.log;
}

config-v1.1.xml

<?xml version="1.0"?>
<clientConfig version="1.1">
    <emailProvider id="woodpeckersnest.eu">
      <domain>woodpeckersnest.eu</domain>

      <displayName>Woodpeckers Mail</displayName>
      <displayShortName>woodpeckers</displayShortName>

      <!-- type=
           "imap": IMAP
           "pop3": POP3
           -->

      <incomingServer type="imap">
         <hostname>woodpeckersnest.eu</hostname>
         <port>993</port>
           <!-- "plain": no encryption
                "SSL": SSL 3 or TLS 1 on SSL-specific port
                "STARTTLS": on normal plain port and mandatory upgrade to TLS via STARTTLS
                -->
         <socketType>SSL</socketType>
         <username>%EMAILLOCALPART%</username>
            <!-- Authentication methods:
                 "password-cleartext",
                          Send password in the clear
                          (dangerous, if SSL isn't used either).
                          AUTH PLAIN, LOGIN or protocol-native login.
                 "password-encrypted",
                           A secure encrypted password mechanism.
                           Can be CRAM-MD5 or DIGEST-MD5. Not NTLM.
                 "NTLM":
                           Use NTLM (or NTLMv2 or successors),
                           the Windows login mechanism.
                 "GSSAPI":
                           Use Kerberos / GSSAPI,
                           a single-signon mechanism used for big sites.
                 "client-IP-address":
                           The server recognizes this user based on the IP address.
                           No authentication needed, the server will require no username nor password.
                 "TLS-client-cert":
                           On the SSL/TLS layer, the server requests a client certificate and the client sends one (possibly after letting the user select/confirm one), if available. (Not yet supported by Thunderbird)
                 "OAuth2":
                           OAuth2. Works only on specific hardcoded servers, please see below. Should be added only as second alternative.
                 "none":
                           No authentication
                 -->
         <authentication>password-cleartext</authentication>
      </incomingServer>


      <outgoingServer type="smtp">
         <hostname>woodpeckersnest.eu</hostname>
         <port>587</port>
         <socketType>STARTTLS</socketType> <!-- see <incomingServer> -->
         <username>%EMAILLOCALPART%</username> <!-- if smtp-auth -->
            <!-- smtp-auth (RFC 2554, 4954) or other auth mechanism.
                 For values, see incoming.
                 Additional options here:
                 "SMTP-after-POP":
                     authenticate to incoming mail server first
                     before contacting the smtp server.
                  Compatibility note: Thunderbird 3.0 accepts only "plain",
                  "secure", "none", and "smtp-after-pop".
                  It will ignore the whole XML file, if other values are given.
            -->
         <authentication>password-cleartext</authentication>
            <!-- If the server makes some additional requirements beyond
                 <authentication>.
                 "client-IP-address": The server is only reachable or works,
                     if the user is in a certain IP network, e.g.
                     the dialed into the ISP's network (DSL, cable, modem) or
                     connected to a company network.
                     Note: <authentication>client-IP-address</>
                     means that you may use the server without any auth.
                     <authentication>password-cleartext</> *and*
                     <restriction>client-IP-address</> means that you need to
                     be in the correct IP network *and* (should) authenticate.
                     Servers which do that are highly discouraged and
                     should be avoided, see {{bug|556267}}.
                Not yet implemented. Spec (element name?) up to change.
            -->
         <!-- remove the following and leave to client/user? -->
         <addThisServer>true</addThisServer>
         <useGlobalPreferredServer>true</useGlobalPreferredServer>
      </outgoingServer>

    </emailProvider>

    <!-- This allows to access the webmail service of the provider.
         The URLs are loaded into a standard webbrowser for the user.
         Specifying this is optional. -->
    <webMail>
      <!-- Webpage where the user has to log in manually by entering username
           and password himself.
           HTTPS required. -->
      <loginPage url="https://webmail.woodpeckersnest.space/" />

      <!-- Same as loginAutomaticDOM, but the website makes checks that
           the user comes from the login page. So, open the login page
           in the browser, get the page's DOM, fill out name and password
           fields for the user, and trigger the login button.
           The login button might not be an HTML button, just a div, so
           to trigger it, send a click event to it.
           HTTPS is required for the URL. -->
      <loginPageInfo url="https://webmail.woodpeckersnest.space">
        <!-- What to fill into the usernameField.
             Format is the same as for <username> within <incomingServer>,
             including placeholders. See below for valid placeholders. -->
        <username>%EMAILLOCALPART%</username>
      </loginPageInfo>
    </webMail>

    <clientConfigUpdate url="https://woodpeckersnest.eu/.well-known/autoconfig/mail/config-v1.1.xml" />

</clientConfig>

Modding converse.js

Written by Simone

Here are a few tweaks that make my "converse.js" experience better:

Remove link from banner: I accidentally used to click that and be teleported to converse.js official webclient, so I thought it could be misleading for unaware users using my locally hosted version of the software.

Search and replace/remove the href bit in converse.min.js, under the dist directory:

<a class="brand-heading" href="https://conversejs.org" target="_blank" rel="noopener">

In the "converse.min.css" file, search for this string and fill it with the following code to have unread MUCs underlined and colored in red:

.list-item.unread-msgs

.list-item.unread-msgs{font-weight:700; text-decoration: underline red;}

Fix color for toolbar-utilities when in 1:1 chats: find this line in "converse.min.css"

.fas:hover svg{fill:var(--chat-head-color)}

and replace with:

.fas:hover svg{fill:var(--chat-toolbar-btn-color)}

Raise minimum chat text area: find this bit in "converse.min.css"

min-height:var(--chat-textarea-height);

and replace with custom value in pixels, e.g.

min-height:120px;

Set a smaller line height for chats list: find the first occurrence of this code in "converse.min.css"

.conversejs .items-list .list-item

and continue until you find:

height:2.5em

substitute it with something like height:2.0em

Removing a space in quoted reply for "actions" plugin: find the following string in your conversejs/dist/plugins/actions/action.js

return ">" + nick + ' : '

remove the offending space

return ">" + nick + ': '

Changing from :smiley: to :thumbsup: emoji for the "Like" actions plugin function: find the following string in your conversejs/dist/plugins/actions/action.js

actions_reactions: [
                                    {name: 'like', label: 'Like', emoji: ':smiley:', icon_class: 'fa fa-check'},

and replace with:

actions_reactions: [
                                    {name: 'like', label: 'Like', emoji: ':thumbsup:', icon_class: 'fa fa-check'},

Fix background-color for screencast plugin icon: replace the class in row #25 in screencast.js

<button class="plugin-screencast"

<button class="btn"

Migrate whole system from one host to another

Written by Simone

I recently moved from OVH to Contabo for my VPS: since setting up everything from scratch looked like a hard challenge, I moved everything using rsync.

Firstly, some preparations:

  • installed the same kernel I had on OVH
  • rebooted Contabo
  • installed rsync on Contabo

Then I switched to the OVH shell:

  • created a exclude.txt file with all the directory and file I didn't want to move:
/boot/
/etc/modules
/etc/fstab
/etc/mtab
/etc/netconfig
/etc/networks
/etc/network/
/etc/ssh/
/etc/cloud/
/etc/cloud-release
/etc/grub.d/
/etc/host.conf
/etc/hostname
/etc/hosts
/etc/hosts.allow
/etc/hosts.deny
/etc/init.d/cloud-config
/etc/init.d/cloud-final
/etc/init.d/cloud-init
/etc/init.d/cloud-init-local
/etc/initramfs-tools/
/etc/default/grub
/etc/default/grub.d/
/etc/kernel/
/etc/kernel-img.conf
/lib/modules/
/lost+found/
/sys/
/proc/
/dev/
/tmp/
/var/cache/
/var/log/journal/
/mnt/
/root/.ssh/
  • moved it to /root/exclude.txt

  • stopped all the running services

    systemctl stop

  • now we can begin rsync-ing: you have to have access to the root user on destination VPS

    rsync -avzP --exclude-from=/root/exclude.txt / root@CONTABO_IP:/

  • after that, I edited /etc/fstab to add support for quota, like I had on OVH

  • then I searched and grepped /etc for my OVH IP address, because I knew it was set somewhere on some config file

    grep -r “OVH IP” /etc/*

  • and substituted it with the new Contabo IP, where necessary.

Finally, I could reboot Contabo:

reboot

Once up & running again, I changed all DNS entries from OVH to Contabo IP.. And waited 😀

  • Last but not least, I edited etc/hosts manually to reflect the new Domain Name address and also set up the hostname

    hostnamectl set-hostname

Done!

EDIT! A detail I missed to mention is that your destination host's root password will be changed, after rsync-ing, to the one of the source host!!

Special characters in DBs are a no-go

Written by Simone

Remember: don't ever use special characters in your DB's users password!!

I have been troubleshooting a migration from mariadbd to pgsql for several hours, until I tried changing my password, which, weirdly enough, was working to connect roundcube but gave errors with pgloader. Once I successfully migrated using the same password with those special characters, roundcube wouldn't connect with pgsql, so I made another fighting round! Finally changed my pgsql password to some letters and numbers only and BAM!, it worked.

Then I stopped mariadbd and disabled the service; now I have more than 200MB RAM freed¹.

¹ See previous post.

mariadbd is a memory hog

Written by Simone

A fat pig eating with its mouth and nose all dirty

I'm still struggling to understand why mariadbd uses so much memory for just 1 DB and 1 application, which in this case is roundcube.

I tried changing this value to no avail.. If anyone wants to share some thoughts I would appreciate:

[mariadb]
innodb_buffer_pool_size=128M

Leave a comment if you know shit. Thanks

EDIT: some details

OVH VPS, 1 core, 2GB, 20 GB SSD. mariadb-server 1:10.11.4-1~deb12u1. roundcube DB size 2.41MB, 17 tables. RAM taken at process restart 240MB.

Unauthenticated email from [DOMAIN] is not accepted due to 550-5.7.26 domain's DMARC policy.

Written by Simone

I was enabling Exim on my IONOS VPS to deliver email through a smarthost and encountered the error message in this post's title (unable to send to Gmail users.. It's always them!)

After fiddling a while with DMARK and SPF I reconfigured Exim itself to rewrite sender address, so that emails coming from "spacenest.it" (IONOS domain) were sent as coming from "woodpeckersnest.eu", the smarthost and real email server.

Everything is done via this command:

# dpkg-reconfigure exim4-config

And the resulting configuration in /etc/exim4/update-exim4.conf is:

dc_eximconfig_configtype='smarthost'
dc_other_hostnames='cassandra.spacenest.it;spacenest.it'
dc_local_interfaces='127.0.0.1'
dc_readhost='woodpeckersnest.eu'
dc_relay_domains=''
dc_minimaldns='false'
dc_relay_nets=''
dc_smarthost='pandora.woodpeckersnest.space::587'
CFILEMODE='644'
dc_use_split_config='false'
dc_hide_mailname='true'
dc_mailname_in_oh='true'
dc_localdelivery='mail_spool'

On OVH's postfix I just had to modify this line in /etc/postfix/main.cf:

mynetworks = 127.0.0.0/8 [::ffff:127.0.0.0]/104 [::1]/128 94.143.138.27/32

where that last IP is the IP Address of my IONOS server.