Posts tagged with “mail”

Grand Opening: Istanza Italiana Chatmail per DeltaChat

Written by Simone

Istanza Italiana Chatmail per DeltaChat

Annunciazione, annunciazione! [cit. per i diversamente giovani]

Da qualche giorno è nata l'istanza Italiana Chatmail per DeltaChat.. Arabo?

Delta Chat è un’app di messaggistica che funziona tramite e-mail

Chatmail è un server di posta "particolare", progettato per l'utilizzo con DeltaChat

Il nostro amico Federico, in arte Fede 😀 ha deciso di sponsorizzare il progetto con un VPS dedicato, sul quale Io ho poi provveduto ad installare il servizio Chatmail, la cui componente web può essere visitata al seguente indirizzo: https://chatmail.woodpeckersnest.space/

Tramite l'appena citato sito web potete registrare il vostro account mail anonimo "chatmail" da usare in DeltaChat: è sufficiente scansionare il QR code con l'app di DeltaChat e sarete immediatamente loggati sul server. Tutte le future conversazioni saranno esclusivamente cifrate e2ee.

A questo punto dovrete aggiungere qualche amico o unirvi ad un gruppo di altre persone. Il QR è sempre la via per fare tutto ciò.. Ed a questo proposito lascio qui il link del QR ed il QR stesso, utili per entrare nel gruppo (più o meno) ufficiale dell'istanza, dove troverete me, Fede, Andrea, darhma, ndo, Mario etc..

https://i.delta.chat/#75ECE59BC33C55BC5CB2806F79A21449ACAE7794&a=g2gxnldub%40chatmail.woodpeckersnest.space&g=Amici%20Delta%20Cchino%20%CE%B4%F0%9F%A6%83%EF%B8%8F&x=g9GMUqKwvgB&i=wulxg33Uejf&s=rt8doIoYNtE

Ah, e non dimenticate di leggere anche la pagina sulla privacy Tutto il sito verrà a breve tradotto in Italiano (grazie Andrea).. Soon Done!!

Guida

Si riportano qui i comandi base per installare il proprio server chatmail autogestito. Per tutte le altre specifiche, comandi, suggerimenti e dettagli vari si prega di far riferimento alla guida ufficiale https://github.com/deltachat/chatmail/blob/main/README.md

Installazione del tuo server chatmail

Usiamo chat.esempio.org come dominio chatmail nei passi seguenti. Sostituiscilo col tuo dominio.

  1. Installa il comando cmdeploy in virtualenv:
 git clone https://github.com/deltachat/chatmail
 cd chatmail
 scripts/initenv.sh
  1. Crea il file di configurazione chatmail.ini:

scripts/cmdeploy init chat.esempio.org # <-- usa il tuo dominio

  1. Imposta prima i record DNS per il tuo dominio chatmail, secondo i suggerimenti proposti da cmdeploy init

Verifica che l'accesso SSH come root funzioni:

ssh root@chat.esempio.org # <-- usa il tuo dominio

  1. Installalo sul tuo server remoto:

scripts/cmdeploy run

Questo script inoltre ti mostrerà dei record DNS aggiuntivi che dovresti configurare sul tuo provider (potrebbe passare del tempo perché siamo resi pubblici).

Le porte da aprire sul server sono: 25, 80, 143, 443, 465, 587, 993.

Consigli per l'installazione

Bene, per finire vorrei lasciare qualche consiglio sull'installazione di Chatmail, sperando che qualcun altro decida di creare un'altra istanza in futuro.

La guida nel README del repository Github è già sufficiente, ma un paio di appunti vorrei farli:

  • Innanzi tutto in caso la cosa risultasse poco chiara, per installare Chatmail su un VPS remoto, avremo bisogno di una macchina locale dalla quale fare il "deploy".

Io ho usato una Virtual Machine Debian 12 installata in Windows 10 tramite WSL, e come destinazione per il server Chatmail abbiamo di nuovo scelto una Debian 12.. Debian rocks!

  • Seconda nota: quando comincerete a lanciare i vari script/cmdeploy verso il server remoto vi verrà chiesta una password.. e qui casca l'asino.

La password che il servizio si aspetta è la "passphrase" della chiave SSH dell'utente root sul VPS remoto E NON la password dell'utente root. Va da sè che dovrete aggiungere una chiave SSH prima di cominciare il deploy.

Ultima cosa da sapere, anche se è accennata anche nel README, è che dopo il comando scripts/cmdeploy run verranno stampati a schermo tutti i record DNS, necessari al server di posta, che andranno inseriti nel pannello di controllo del vostro registrar. Niente di nuovo direi, visto che per cominciare l'installazione viene già chiesto di registrare il dominio principale.. Tuttavia preparatevi a configurare record TXT, SRV, CAA, MX.

Vi lascio con un paio di comandi utili a fine installazione:

journalctl -u postfix.service (leggere i log del server di posta)

Sostituite il servizio per leggere ad esempio i log degli accessi SSH

journalctl -u ssh.service

mailq (leggere la coda dei messaggi non ancora recapitati - per qualsiasi motivo)

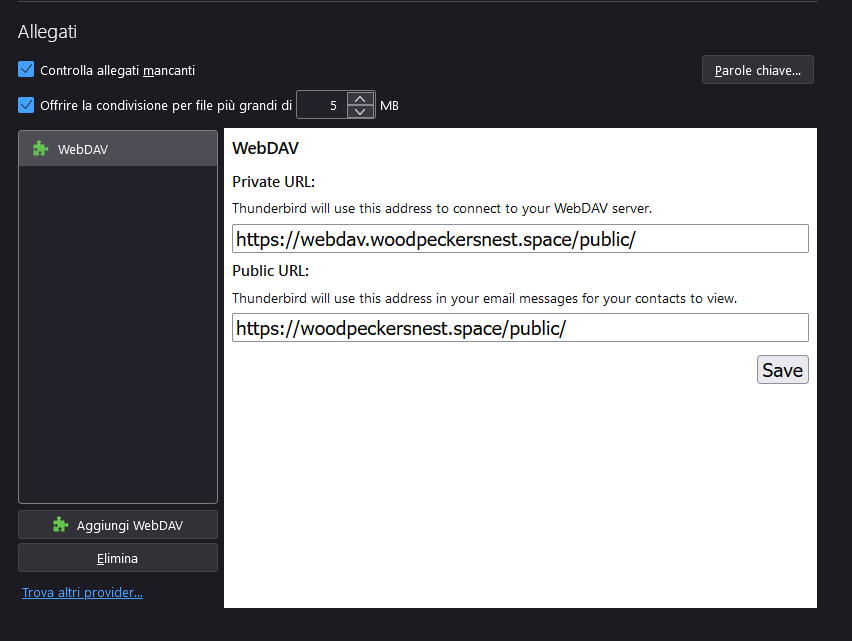
La configurazione del webserver sta dentro /etc/nginx/nginx.conf La directory dove sono ospitati i file veri e proprio è la classica /var/www/html/

Ultima cosa: verificate che il vostro gestore VPS lasci aperta la porta 25, o se vada richiesto espressamente, come ad esempio succede per IONOS e Digital Oceans.

Si ringraziano tutti i DeltaCchini 😘

FIN!

Notes

Written by Simone

I'll update this post whenever I see fits, A.K.A. when I have other bits of information which don't require a whole post.

Operations on files and directories

Move files and directories to the current/parent directory in Linux

Current dir

find . -type f -exec mv {} . \;

Parent dir

find . -type f -exec mv {} .. \;

Recursive chmod on files and dirs

To change all the directories to 755 (-rwxr-xr-x):

find /var/www/blog -type d -exec chmod 755 {} \;

To change all the files to 644 (-rw-r--r--):

find /var/www/blog -type f -exec chmod 644 {} \;

Certbot common commands

Register single domain:

certbot certonly --standalone -d domain.tld --dry-run

Renew single domain:

certbot renew --cert-name domain.tld --dry-run
  • Remove “–dry-run” when ok.

Revoke certificate:

certbot revoke --cert-path /etc/letsencrypt/archive/${YOUR_DOMAIN}/cert1.pem

Check certificate's expiry date:

cat /etc/letsencrypt/live/domain.tld/cert.pem | openssl x509 -noout -enddate

GIT

To reset your git repository to given commit id, do:

git reset --hard <commit-id>
git push origin master --force

Ignoring files that are already tracked

git update-index --assume-unchanged <your file here>

Delta Chat Mail sieve

require ["fileinto"];
# rule:[DeltaChat]
if header :contains "Chat-Version" "1.0"
{
	fileinto "DeltaChat";
	stop;
}

Postfix mail queue

To view postfix mail queue in case of problems and remove a particular message from it, do as follows:

# mailq

-Queue ID-  --Size-- ----Arrival Time---- -Sender/Recipient-------
6DCF32201B*    4824 Thu Oct 19 22:54:44  roughnecks@woodpeckersnest.eu
                                         debian@spacenet.it

-- 4 Kbytes in 1 Request.
# postsuper -d 6DCF32201B

postsuper: 6DCF32201B: removed
postsuper: Deleted: 1 message

Check Preferred Outgoing IP (when multiple are set on <interface>)

curl ifconfig.me

The correct command to add a new Linux user (in this case without a shell)

adduser --shell /usr/sbin/nologin <username>

I always forget which command is the complete one, useradd or adduser

Thunderbird Autoconfiguration

Written by Simone

Set up Thunderbird autoconfiguration for my lil mail server. Working good.

nginx config:

server {
        listen [::]:443 ssl http2;
        server_name woodpeckersnest.eu;

        ssl_certificate /etc/letsencrypt/live/woodpeckersnest.eu/fullchain.pem;
        ssl_certificate_key /etc/letsencrypt/live/woodpeckersnest.eu/privkey.pem;

        root /var/www/mail/;
        location / {
                try_files /.well-known/autoconfig/mail/config-v1.1.xml =404;
        }

    access_log /var/log/nginx/autoconfig.log;
    error_log /var/log/nginx/autoconfig_error.log;
}

config-v1.1.xml

<?xml version="1.0"?>
<clientConfig version="1.1">
    <emailProvider id="woodpeckersnest.eu">
      <domain>woodpeckersnest.eu</domain>

      <displayName>Woodpeckers Mail</displayName>
      <displayShortName>woodpeckers</displayShortName>

      <!-- type=
           "imap": IMAP
           "pop3": POP3
           -->

      <incomingServer type="imap">
         <hostname>woodpeckersnest.eu</hostname>
         <port>993</port>
           <!-- "plain": no encryption
                "SSL": SSL 3 or TLS 1 on SSL-specific port
                "STARTTLS": on normal plain port and mandatory upgrade to TLS via STARTTLS
                -->
         <socketType>SSL</socketType>
         <username>%EMAILLOCALPART%</username>
            <!-- Authentication methods:
                 "password-cleartext",
                          Send password in the clear
                          (dangerous, if SSL isn't used either).
                          AUTH PLAIN, LOGIN or protocol-native login.
                 "password-encrypted",
                           A secure encrypted password mechanism.
                           Can be CRAM-MD5 or DIGEST-MD5. Not NTLM.
                 "NTLM":
                           Use NTLM (or NTLMv2 or successors),
                           the Windows login mechanism.
                 "GSSAPI":
                           Use Kerberos / GSSAPI,
                           a single-signon mechanism used for big sites.
                 "client-IP-address":
                           The server recognizes this user based on the IP address.
                           No authentication needed, the server will require no username nor password.
                 "TLS-client-cert":
                           On the SSL/TLS layer, the server requests a client certificate and the client sends one (possibly after letting the user select/confirm one), if available. (Not yet supported by Thunderbird)
                 "OAuth2":
                           OAuth2. Works only on specific hardcoded servers, please see below. Should be added only as second alternative.
                 "none":
                           No authentication
                 -->
         <authentication>password-cleartext</authentication>
      </incomingServer>


      <outgoingServer type="smtp">
         <hostname>woodpeckersnest.eu</hostname>
         <port>587</port>
         <socketType>STARTTLS</socketType> <!-- see <incomingServer> -->
         <username>%EMAILLOCALPART%</username> <!-- if smtp-auth -->
            <!-- smtp-auth (RFC 2554, 4954) or other auth mechanism.
                 For values, see incoming.
                 Additional options here:
                 "SMTP-after-POP":
                     authenticate to incoming mail server first
                     before contacting the smtp server.
                  Compatibility note: Thunderbird 3.0 accepts only "plain",
                  "secure", "none", and "smtp-after-pop".
                  It will ignore the whole XML file, if other values are given.
            -->
         <authentication>password-cleartext</authentication>
            <!-- If the server makes some additional requirements beyond
                 <authentication>.
                 "client-IP-address": The server is only reachable or works,
                     if the user is in a certain IP network, e.g.
                     the dialed into the ISP's network (DSL, cable, modem) or
                     connected to a company network.
                     Note: <authentication>client-IP-address</>
                     means that you may use the server without any auth.
                     <authentication>password-cleartext</> *and*
                     <restriction>client-IP-address</> means that you need to
                     be in the correct IP network *and* (should) authenticate.
                     Servers which do that are highly discouraged and
                     should be avoided, see {{bug|556267}}.
                Not yet implemented. Spec (element name?) up to change.
            -->
         <!-- remove the following and leave to client/user? -->
         <addThisServer>true</addThisServer>
         <useGlobalPreferredServer>true</useGlobalPreferredServer>
      </outgoingServer>

    </emailProvider>

    <!-- This allows to access the webmail service of the provider.
         The URLs are loaded into a standard webbrowser for the user.
         Specifying this is optional. -->
    <webMail>
      <!-- Webpage where the user has to log in manually by entering username
           and password himself.
           HTTPS required. -->
      <loginPage url="https://webmail.woodpeckersnest.space/" />

      <!-- Same as loginAutomaticDOM, but the website makes checks that
           the user comes from the login page. So, open the login page
           in the browser, get the page's DOM, fill out name and password
           fields for the user, and trigger the login button.
           The login button might not be an HTML button, just a div, so
           to trigger it, send a click event to it.
           HTTPS is required for the URL. -->
      <loginPageInfo url="https://webmail.woodpeckersnest.space">
        <!-- What to fill into the usernameField.
             Format is the same as for <username> within <incomingServer>,
             including placeholders. See below for valid placeholders. -->
        <username>%EMAILLOCALPART%</username>
      </loginPageInfo>
    </webMail>

    <clientConfigUpdate url="https://woodpeckersnest.eu/.well-known/autoconfig/mail/config-v1.1.xml" />

</clientConfig>

Mailing List for Delta Chat with mlmmj

Written by Simone

These days I am tinkering with a Mailing List for Delta Chat powered by mlmmj

I was able to create the list and set up Postfix correctly - instructions are quite clear even if on a couple settings I had to do some troubleshooting looking at logs.. Now I have this Mailing List called deltachat@woodpeckersnest.eu which you can subscribe to by sending an email to deltachat+subscribe@woodpeckersnest.eu and following further instructions.

Initially Delta Chat would create groups of people with the ML's address inside of it, thus splitting every conversation by users participating in it. This was later fixed by adding the following lines in list-dir/control/customheaders file:

X-Mailinglist: deltachat
Reply-To: deltachat@woodpeckersnest.space
List-ID: DC Mailing List <deltachat.woodpeckersnest.eu>
List-Post: <mailto:deltachat@woodpeckersnest.eu>

Now a proper Super Group is created and everyone¹ is able to message in it.

¹ Well, not actually everyone since a member still has issues but I'm positive that can be fixed by chatting again with the ML's address and removing all weird groups created earlier.

This ^ is how the supergroup looks in my chat window - the avatar is only local, it can't be set for every member but the name is the same for everyone.

Then someone "complained" for the lack of anonymity for users email addresses, like it's done in the "official" Delta Chat's MLs.. So I asked on codeberg but it seems to be a missing feature (I'm still waiting for replies 😬).

This is it for now, will keep you posted when/if I have news.

Thunderbird sieve extension

Written by Simone

Little OT, but not so much 😀

To manage your sieve scripts from Thunderbird 115 there's this nightly build, until developer will code a proper release with fixes.

You can read the issue at https://github.com/thsmi/sieve/issues/893 and I've uploaded the file for convenience here.

My server comes with a default sieve to filter spam messages and another one to move Delta Chat emails:

require ["fileinto"];
# rule:[DeltaChat]
if header :contains "Chat-Version" "1.0"
{
	fileinto "DeltaChat";
	stop;
}
# rule:[SPAM Check]
if header :contains "X-Spam-Flag" "YES"
{
	fileinto "Junk";
	stop;
}

File attachment:

xpi---thunderbird-webextension.zip (897.1 KB)

Special characters in DBs are a no-go

Written by Simone

Remember: don't ever use special characters in your DB's users password!!

I have been troubleshooting a migration from mariadbd to pgsql for several hours, until I tried changing my password, which, weirdly enough, was working to connect roundcube but gave errors with pgloader. Once I successfully migrated using the same password with those special characters, roundcube wouldn't connect with pgsql, so I made another fighting round! Finally changed my pgsql password to some letters and numbers only and BAM!, it worked.

Then I stopped mariadbd and disabled the service; now I have more than 200MB RAM freed¹.

¹ See previous post.

Unauthenticated email from [DOMAIN] is not accepted due to 550-5.7.26 domain's DMARC policy.

Written by Simone

I was enabling Exim on my IONOS VPS to deliver email through a smarthost and encountered the error message in this post's title (unable to send to Gmail users.. It's always them!)

After fiddling a while with DMARK and SPF I reconfigured Exim itself to rewrite sender address, so that emails coming from "spacenest.it" (IONOS domain) were sent as coming from "woodpeckersnest.eu", the smarthost and real email server.

Everything is done via this command:

# dpkg-reconfigure exim4-config

And the resulting configuration in /etc/exim4/update-exim4.conf is:

dc_eximconfig_configtype='smarthost'
dc_other_hostnames='cassandra.spacenest.it;spacenest.it'
dc_local_interfaces='127.0.0.1'
dc_readhost='woodpeckersnest.eu'
dc_relay_domains=''
dc_minimaldns='false'
dc_relay_nets=''
dc_smarthost='pandora.woodpeckersnest.space::587'
CFILEMODE='644'
dc_use_split_config='false'
dc_hide_mailname='true'
dc_mailname_in_oh='true'
dc_localdelivery='mail_spool'

On OVH's postfix I just had to modify this line in /etc/postfix/main.cf:

mynetworks = 127.0.0.0/8 [::ffff:127.0.0.0]/104 [::1]/128 94.143.138.27/32

where that last IP is the IP Address of my IONOS server.

Going without casters

Written by Simone

I had previously discussed this issue on XMPP and on my Schleuder Mailing List, but there's news.

My ".space" domain is blacklisted by Google and others top email services because it is considered spammy - I still don't understand how you can blacklist a whole tld for spam but that's how it goes..

So I purchased a new ".eu" domain and set it up as virtual host in postfix.. But I was still using a third party relay to deliver emails to Gmail, Hotmail and iCloud. This relay works with "credits", each email you send using their free service is equal to 1 credit and you get 1000 credits per month (BIG Thanks to Kévin from Delta Chat for helping me out with this).

Now, I haven't ever reached the maximum allowed quota but I felt like removing the casters at least for Gmail, since this .eu domain should do the job just fine and because I cannot actually remove Hotmail, since they have my server IP banned for whatever reason.

So, I removed the gmail line in my transport file for postfix, ran postmap and reloaded postfix.service. Finally I sent a Ping over to "Delta Chat Italian Offtopic Group" where there are 2 people with gmail accounts and everything was fine, no email returned back to sender.

I'll keep going like this until problems!!

Now, if anyone is interested on how my transport file looks like, I'll share 😀

outlook.com smtp:[outbound.mailhop.org]:587
hotmail.com smtp:[outbound.mailhop.org]:587
outlook.fr smtp:[outbound.mailhop.org]:587
hotmail.it smtp:[outbound.mailhop.org]:587
mail.icloud.com smtp:[outbound.mailhop.org]:587
*   :

You need an account on DuoCircle and you need to authenticate yourself (in postfix) for their smtp to accept emails from your server.