Archive of

Sharing big files with Thunderbird filelink on self-hosted webdav

Written by Simone

Thunderbird filelink with self-hosted webdav

Me and friends on xmpp:lozibaldone@conference.xmpp-it.net?join had a discussion about big attachments in Thunderbird and one person ("idice"), which I thank, suggested to use (long forgotten by me) Thunderbird's "filelink" functionality.

filelink lets you upload your big attachments to the cloud and send a link to download them, to your email contact. For it to work, you have to download an extension for Thunderbird and choose a cloud instance.

There are a few in the community, ranging from Dropbox, to Nectcloud and webdav. I chose webdav, because I already have a docker container with a running instance.

The tricky part in setting the extension up and working with my server was to have a private and a public URLs: you have credentials for webdav, so the private one is easily accomplished, while I had never thought about having a public site to share stuff without authentication; and in the end it was really straightforward.

What I did was basically: mount a volume in docker where I want to publish stuff to be shared. So at first when uploading I'm asked for credentials and everything just works.. files go to the volume.

Then, to have people access those files, I simlinked (ln -s) the docker volume dir to a path under my main site's virtualhost in nginx. Like:

My site is in /var/www/html/, so I changed dir to that location and:

ln -s /path/to/public-docker-volume/ public

Now I have a /public/ dir in my website with all the files that I publish in webdav and since index is off in nginx, you can't just browse it - you have to know the exact file name to access it.

And that's it.

Now for the Thunderbird setup, I'll show a few shots. For starters, this is the extension I used: https://addons.thunderbird.net/it/thunderbird/addon/filelink-provider-for-webdav/

This is the "attachments" settings in Thunderbird, the only place where you configure the extension:

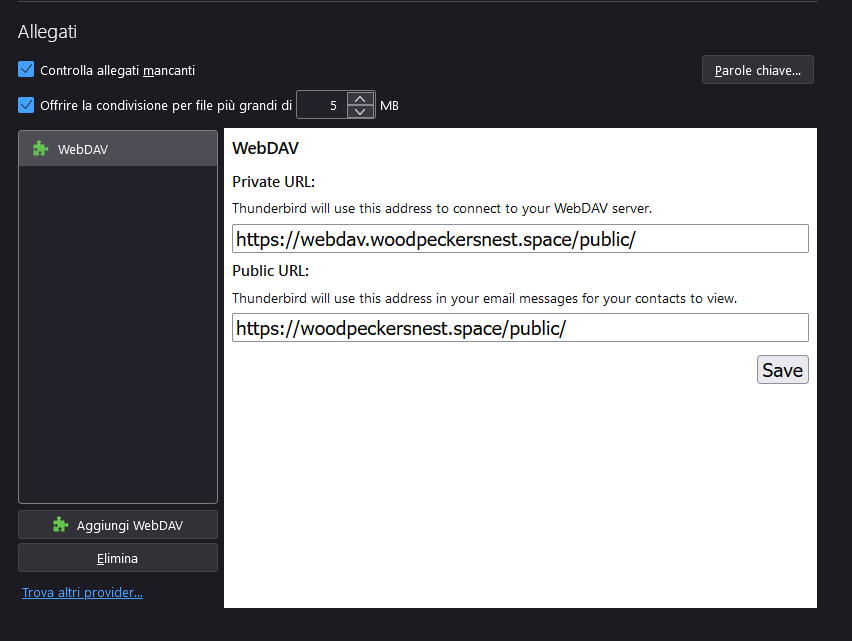
As you can see it asks for a private and a public URLs, as explained before.

When you compose a new message, go to the attachments menu as always and you'll find a new item, called Filelink - WebDAV:

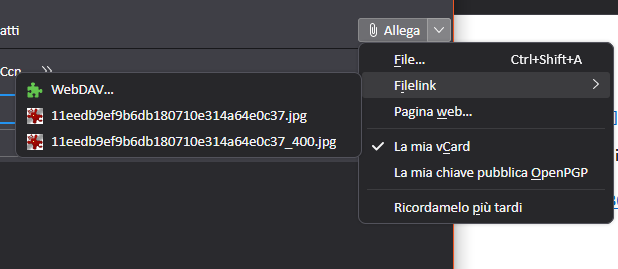
Click it and select your attachment from disk. It will ask for a username and password (those you set up for webdav in docker) and will begin uploading the file.

Then you'll see the message being populated like this:
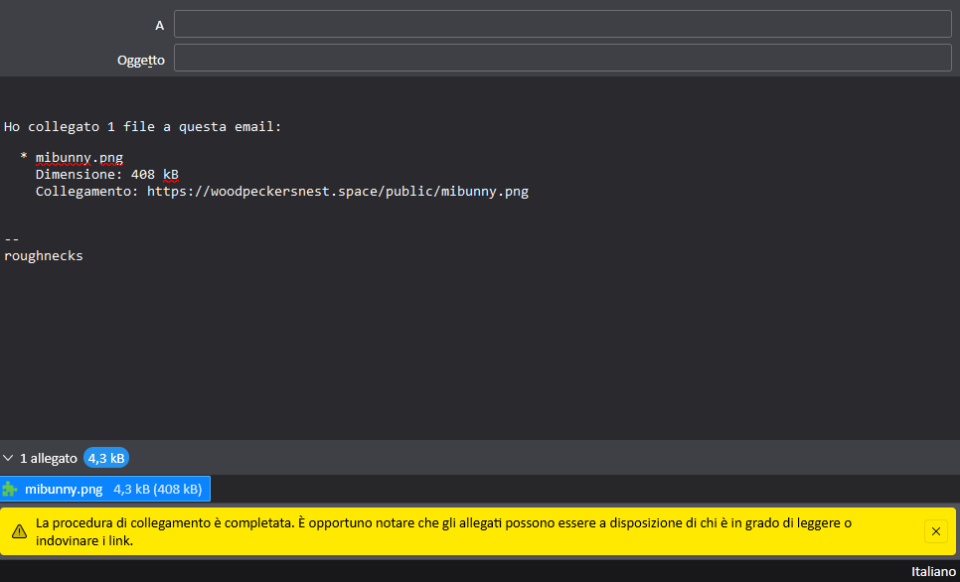
It says:

I have linked 1 file to this email:

  • mibunny.png

    Size: 408 KB

    Link: the link

If you keep uploading files, the number in the first row will be automatically incremented and there will be another file section with new info about it.

And.. we're done!? 😀

If you got any question, leave a comment down below.

Grand Opening: Istanza Italiana Chatmail per DeltaChat

Written by Simone

Istanza Italiana Chatmail per DeltaChat

Annunciazione, annunciazione! [cit. per i diversamente giovani]

Da qualche giorno è nata l'istanza Italiana Chatmail per DeltaChat.. Arabo?

Delta Chat è un’app di messaggistica che funziona tramite e-mail

Chatmail è un server di posta "particolare", progettato per l'utilizzo con DeltaChat

Il nostro amico Federico, in arte Fede 😀 ha deciso di sponsorizzare il progetto con un VPS dedicato, sul quale Io ho poi provveduto ad installare il servizio Chatmail, la cui componente web può essere visitata al seguente indirizzo: https://chatmail.woodpeckersnest.space/

Tramite l'appena citato sito web potete registrare il vostro account mail anonimo "chatmail" da usare in DeltaChat: è sufficiente scansionare il QR code con l'app di DeltaChat e sarete immediatamente loggati sul server. Tutte le future conversazioni saranno esclusivamente cifrate e2ee.

A questo punto dovrete aggiungere qualche amico o unirvi ad un gruppo di altre persone. Il QR è sempre la via per fare tutto ciò.. Ed a questo proposito lascio qui il link del QR ed il QR stesso, utili per entrare nel gruppo (più o meno) ufficiale dell'istanza, dove troverete me, Fede, Andrea, darhma, ndo, Mario etc..

https://i.delta.chat/#75ECE59BC33C55BC5CB2806F79A21449ACAE7794&a=g2gxnldub%40chatmail.woodpeckersnest.space&g=Amici%20Delta%20Cchino%20%CE%B4%F0%9F%A6%83%EF%B8%8F&x=g9GMUqKwvgB&i=wulxg33Uejf&s=rt8doIoYNtE

Ah, e non dimenticate di leggere anche la pagina sulla privacy Tutto il sito verrà a breve tradotto in Italiano (grazie Andrea).. Soon Done!!

Guida

Si riportano qui i comandi base per installare il proprio server chatmail autogestito. Per tutte le altre specifiche, comandi, suggerimenti e dettagli vari si prega di far riferimento alla guida ufficiale https://github.com/deltachat/chatmail/blob/main/README.md

Installazione del tuo server chatmail

Usiamo chat.esempio.org come dominio chatmail nei passi seguenti. Sostituiscilo col tuo dominio.

  1. Installa il comando cmdeploy in virtualenv:
 git clone https://github.com/deltachat/chatmail
 cd chatmail
 scripts/initenv.sh
  1. Crea il file di configurazione chatmail.ini:

scripts/cmdeploy init chat.esempio.org # <-- usa il tuo dominio

  1. Imposta prima i record DNS per il tuo dominio chatmail, secondo i suggerimenti proposti da cmdeploy init

Verifica che l'accesso SSH come root funzioni:

ssh root@chat.esempio.org # <-- usa il tuo dominio

  1. Installalo sul tuo server remoto:

scripts/cmdeploy run

Questo script inoltre ti mostrerà dei record DNS aggiuntivi che dovresti configurare sul tuo provider (potrebbe passare del tempo perché siamo resi pubblici).

Le porte da aprire sul server sono: 25, 80, 143, 443, 465, 587, 993.

Consigli per l'installazione

Bene, per finire vorrei lasciare qualche consiglio sull'installazione di Chatmail, sperando che qualcun altro decida di creare un'altra istanza in futuro.

La guida nel README del repository Github è già sufficiente, ma un paio di appunti vorrei farli:

  • Innanzi tutto in caso la cosa risultasse poco chiara, per installare Chatmail su un VPS remoto, avremo bisogno di una macchina locale dalla quale fare il "deploy".

Io ho usato una Virtual Machine Debian 12 installata in Windows 10 tramite WSL, e come destinazione per il server Chatmail abbiamo di nuovo scelto una Debian 12.. Debian rocks!

  • Seconda nota: quando comincerete a lanciare i vari script/cmdeploy verso il server remoto vi verrà chiesta una password.. e qui casca l'asino.

La password che il servizio si aspetta è la "passphrase" della chiave SSH dell'utente root sul VPS remoto E NON la password dell'utente root. Va da sè che dovrete aggiungere una chiave SSH prima di cominciare il deploy.

Ultima cosa da sapere, anche se è accennata anche nel README, è che dopo il comando scripts/cmdeploy run verranno stampati a schermo tutti i record DNS, necessari al server di posta, che andranno inseriti nel pannello di controllo del vostro registrar. Niente di nuovo direi, visto che per cominciare l'installazione viene già chiesto di registrare il dominio principale.. Tuttavia preparatevi a configurare record TXT, SRV, CAA, MX.

Vi lascio con un paio di comandi utili a fine installazione:

journalctl -u postfix.service (leggere i log del server di posta)

Sostituite il servizio per leggere ad esempio i log degli accessi SSH

journalctl -u ssh.service

mailq (leggere la coda dei messaggi non ancora recapitati - per qualsiasi motivo)

La configurazione del webserver sta dentro /etc/nginx/nginx.conf La directory dove sono ospitati i file veri e proprio è la classica /var/www/html/

Ultima cosa: verificate che il vostro gestore VPS lasci aperta la porta 25, o se vada richiesto espressamente, come ad esempio succede per IONOS e Digital Oceans.

Si ringraziano tutti i DeltaCchini 😘

FIN!