Hello o/
Just completed a new software installment for the "woodpeckers" webmail, powered by roundcube.
It's a plugin to manage CardDAV address books, so you can import them in your web contacts; I've tested it with "Radicale Cal/CardDAV" server and the import to roundcube was fast and easy peasy; hopefully it'll be the same for every other compatible server 😎
https://webmail.woodpeckersnest.space/
Yeah, that was all for your local news! Until next.
Statistiche
$ uptime
 03:54:18 up 34 days,  8:19,  4 users,  load average: 0.00, 0.00, 0.00
$ free -m
               total        used        free      shared  buff/cache   available
Mem:             877         503         159           8         377         374
Swap:            499          87         412
$ df -h
Filesystem      Size  Used Avail Use% Mounted on
udev            428M     0  428M   0% /dev
tmpfs            88M  8.4M   80M  10% /run
/dev/vda1       9.7G  2.8G  6.6G  30% /
tmpfs           439M     0  439M   0% /dev/shm
tmpfs           5.0M     0  5.0M   0% /run/lock
/dev/vda15      124M   12M  113M  10% /boot/efi
tmpfs            88M     0   88M   0% /run/user/1000
$ ip -s link
2: ens6: <BROADCAST,MULTICAST,UP,LOWER_UP> mtu 1500 qdisc fq_codel state UP mode DEFAULT group default qlen 1000
    RX:   bytes  packets errors dropped  missed   mcast
     1444308867 14871375      0   32828       0       0
    TX:   bytes  packets errors dropped carrier collsns
    18414348377 21921709      0       0       0       0
$ curl https://chatmail.woodpeckersnest.space/metrics
accounts 83 1719367201634
store /etc in git, mercurial, brz or darcs
The etckeeper program is a tool to let /etc be stored in a git, mercurial, brz or darcs repository. It hooks into APT to automatically commit changes made to /etc during package upgrades. It tracks file metadata that version control systems do not normally support, but that is important for /etc, such as the permissions of /etc/shadow. It's quite modular and configurable, while also being simple to use if you understand the basics of working with version control.
https://packages.debian.org/stable/etckeeper
root@pandora:/etc# git log --oneline mumble-server.ini
c1e2238 daily autocommit
2e66cf6 daily autocommit
76fd073 daily autocommit
baaff1c saving uncommitted changes in /etc prior to apt run
9980c10 daily autocommit
830fa84 daily autocommit
0cc8fd9 saving uncommitted changes in /etc prior to apt run
4e7b545 saving uncommitted changes in /etc prior to apt run
20d692a daily autocommit
c05a405 saving uncommitted changes in /etc prior to apt run
3a00635 daily autocommit
62e0e1c Initial commit
root@pandora:/etc# git diff c1e2238 2e66cf6 mumble-server.ini
diff --git a/mumble-server.ini b/mumble-server.ini
index 3332154..d91f520 100644
--- a/mumble-server.ini
+++ b/mumble-server.ini
@@ -236,8 +236,8 @@ logdays=5
 ; If you only wish to give your "Root" channel a custom name, then only
 ; uncomment the 'registerName' parameter.
 ;
-registerName=SpaceNest
-registerPassword=sekret
+registerName=SpaceNest[EN/IT]
+registerPassword=newsekret
 registerUrl=https://woodpeckersnest.space/
 registerHostname=voice.woodpeckersnest.space
 registerLocation=IT
Hello, do you remember about Slixfeed? Talked about that here a while ago.
Schimon, the bot's author, chose woodpeckersnest.space to host a new home for it and I was am very happy about that 😀
More to that, he also decided to move Slixfeed's source repository from "gitgud.io" to the Italian XMPP-IT Community GIT server - even if we're not sure everything will be migrated (WIP). Oh, I also want to mention the other XMPP-related projects which Schimon also moved to our community server, which you should check out!
Thanks Schimon for trusting us with your work. Keep it up!
Now, links!
Finally, I would like to remember you that the XMPP-IT Git server is not open to registrations, but if you want an account there to post your work (we only accept XMPP-related stuff!), you can request an account to one of the XMPP-IT admins or by sending an email to "admin [at] xmpp-it [dot] net" with desired username; we'll use that email address of yours to register the account and will set a password for you, to be changed at first login.
Thanks, bye 😀
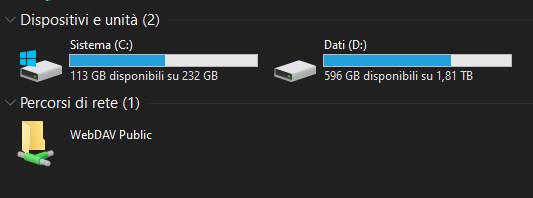
After some failed attempt at this, I think I found the right way to "mount" a remote WebDAV folder under Windows' Explorer.
Initially my baby steps took me here: https://note.woodpeckersnest.space/share/0TJT81fgI8Jy
After following that tutorial I didn't succeed, so I investigated further. I can say that everythig looks correct until you get to point 9.
The address they tell you have to enter isn't correct in my experience and they aren't even using https for the URL.
What worked for me was instead something like:
\\webdav.woodpeckersnest.space@SSL\folder
You have to input the network-path-stile address which is common in Windows, as in: double backslash, FQDN of your WebDAV server, "@SSL" and then the path (folder) where you have access to files in your WebDAV server, with a backslash preceding it.
That's it, a prompt will ask for username and password and then a new Network Path (WebFolder) will be connected in Explorer, just below your local drives.

You can then browse, copy, upload, delete (and so on) whatever content you like.
EDIT: Just found out I couldn't rename files/folders from Windows or Total Commander (Android)
Fixed by setting nginx virtualhost like this:
server {
    listen 443 ssl http2;
    listen [::]:443 ssl http2;
    server_name  webdav.woodpeckersnest.space;


    # HTTPS configuration
    ssl_certificate /etc/letsencrypt/live/webdav.woodpeckersnest.space/fullchain.pem;
    ssl_certificate_key /etc/letsencrypt/live/webdav.woodpeckersnest.space/privkey.pem;

    access_log /var/log/nginx/webdav/access.log;
    error_log /var/log/nginx/webdav/error.log;

  location / {
    set $destination $http_destination;

    if ($destination ~* ^https(.+)$) {
         set $destination http$1;
    }

    proxy_set_header   Destination $destination;
    proxy_set_header   X-Real-IP $remote_addr;
    proxy_set_header   X-Forwarded-For $proxy_add_x_forwarded_for;
    proxy_set_header   Host $host;
    proxy_pass         http://127.0.0.1:17062/;
    proxy_http_version 1.1;
    proxy_set_header   Upgrade $http_upgrade;
    proxy_set_header   Connection "upgrade";
  }

  client_max_body_size 0;

}
Now I'm quite happy 😀
