"Bugs, Mr. Rico. Zillions of em!" Hughes, p. 248; reporting on…
"Bugs, Mr. Rico. Zillions of em!"
- Hughes, p. 248; reporting on a bug assault to LT Juan Rico on Planet P.
"Bugs, Mr. Rico. Zillions of em!"
- Hughes, p. 248; reporting on a bug assault to LT Juan Rico on Planet P.
I opened this issue on RCMCardDAV GitHub repo thinking it was a bug of them, while it turned out it was just ignorance (on my side).
TL;DR:
To make a long story short, if you want to sync groups of contacts, using a CardDAV address book, make sure that every client/sync application is using the same format to store groups. This applies to e.g. roundcube, with the plugin of this post's link, DAVx^5 sync app, and generally each client which supports CardDAV.
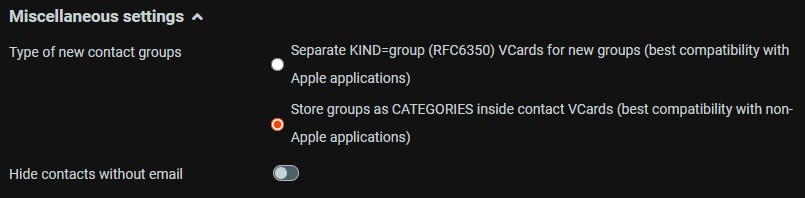
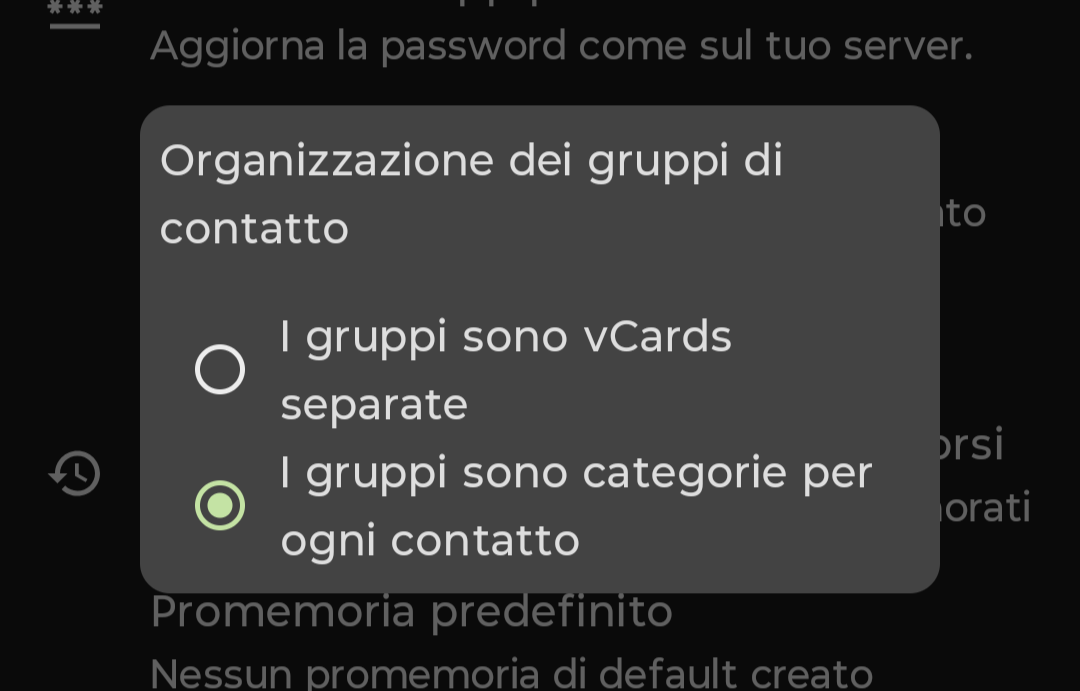
Before setting DAVx^5 to the correct option, groups created on roundcube won't sync correctly to my phone, while the other way around worked fine.
ntfy lets you send push notifications to your phone or desktop via scripts from any computer, using simple HTTP PUT or POST requests. I use it to notify myself when scripts fail, or long-running commands complete.
With the newly installed “ntfy” service, You, as a @wpn user, have access to any topic you may need, with read and write permissions. I am going to send an email to each (shell/email) user account soon, with credentials. “xmpp” users feel free to request access to me, personally or by writing a message here.
For all other interested people, we have set a public topic up, which you can subscribe to, if you like, to be notified about @wpn services status: wpn-status, precisely 😀 and also another topic, to follow xmpp-it services status: xmpp-it-net
Usage examples are all explained in the doc. In short, you currently can:
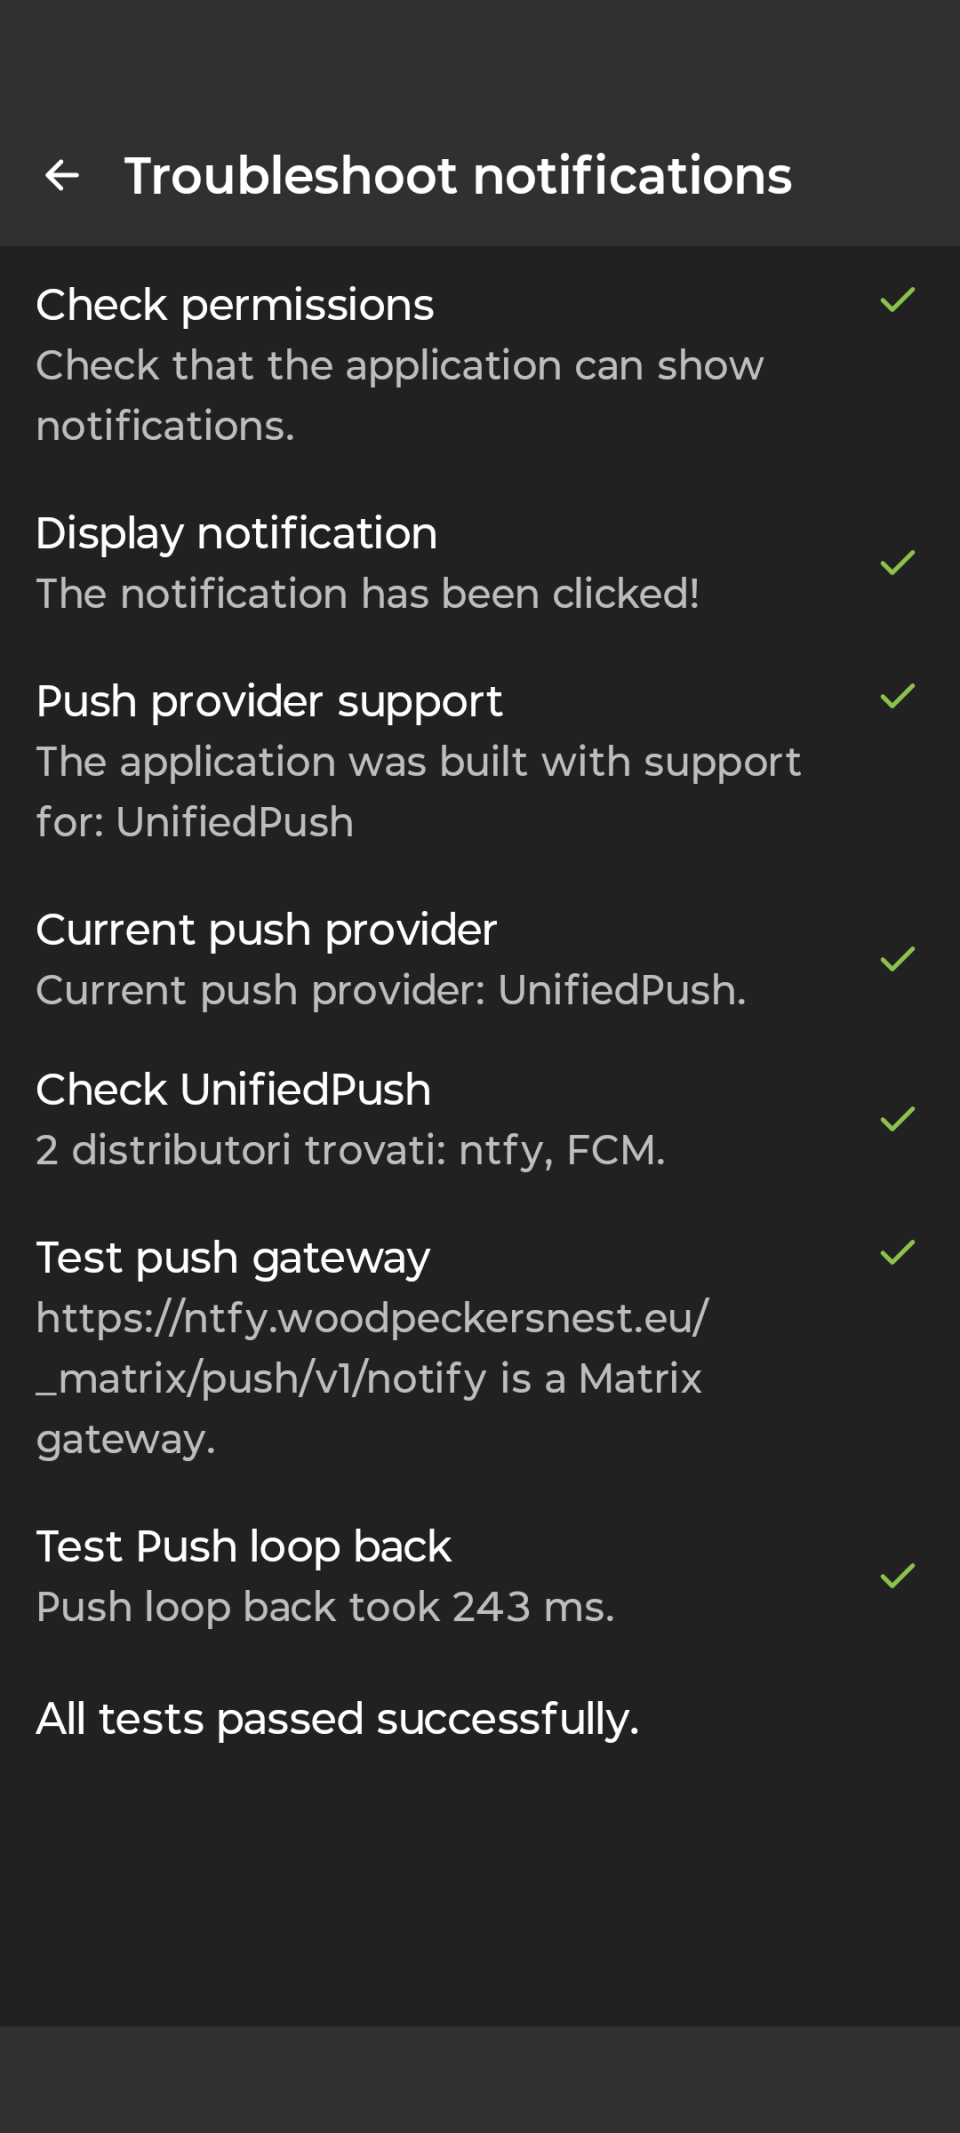
I have tested all of the above and they are supposed to be working.. If you have any problem, please let me know (a comment here would also be okay).
Here's SchildiChatNext notifications troubleshooter:
Thanks to ctapmex for opening a bug issue on #bugzilla, now @woodpeckersnest.space/eu #email accounts will configure automagically when added in #thunderbird, including address books and calendars, powered by our selfhosted #radicale server (#caldav #carddav).
Some references:
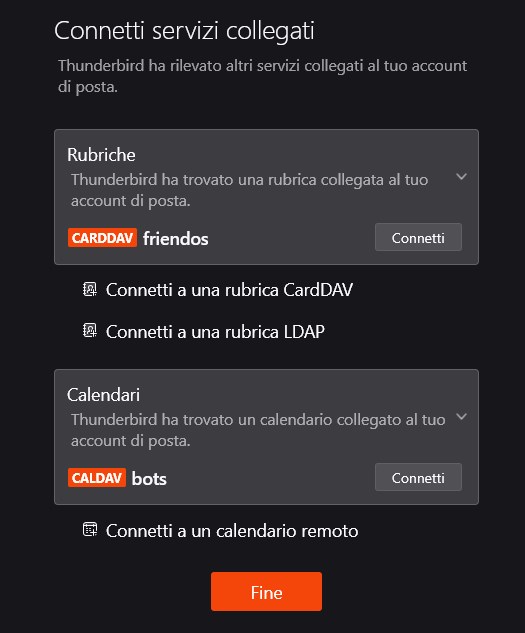
Picture depicts Thunderbird asking what additional services to connect to, after inbox creation - namely #addressbook and #calendar
The past 2 weeks I spent some time configuring tailscale: think of it as your own personal, invisible, and very secure "home-lab" on the internet where only your trusted devices can connect and share information.
But, since it uses wireguard under the hood, and I had already set it up on my VPS - see post1 and post2 - I thought! “Why can't I just do this myself, without relying on a third-party service?”
So, first of all I did a quick test, by sending some text to a “termbin” service (it's like a pastebin but for shells) I run on my VPS. I set it to listen only on the wireguard interface, then activate the wireguard tunnel on my desktop PC at home, opened a shell and sent the following:
echo “termbin test” | nc 172.16.100.1 9999
It worked like a charm, so I immediately started thinking about the whole home-lab thing. And here I am, connected and happy.

**rsnapshot** is a filesystem backup utility for Unix-like systems that uses rsync and hard links to efficiently create incremental snapshots. It stores backups in dated directories, minimizing disk usage by linking unchanged files. Designed for automation, it supports local and remote backups via SSH.
apt install rsnapshot
config_version  1.2
# executables paths on your system
cmd_cp          /bin/cp
cmd_rm          /bin/rm
cmd_rsync       /usr/bin/rsync
cmd_ssh 		/usr/bin/ssh
cmd_du          /usr/bin/du
# type and number of snapshots to execute
retain  alpha   7       #7 snaps, one per day
retain  beta    2       #2 snaps, one per week
retain  gamma   1       #1 snap montly
verbose         2
loglevel        3
logfile 		/var/log/rsnapshot.log
lockfile        /home/roughnecks/rsnapshot.pid
# where to save your snapshots
snapshot_root   /mnt/backup/
# rsnapshot won't create the "root" folder of your backups. Create it yourself
no_create_root  1
# global short rsync args (feel free to adjust)
rsync_short_args        -avz
# uses hard links (keep this)
link_dest       1

# what, where and how to backup
# --rsync-path="sudo rsync" is only needed if you're backing up directories which need root access on the remote host
# --exclude-from=/etc/rsnapshot/exclude_path.list is a list of paths never to be backed up, relative to this backup only

backup  		debian@remote_host:/path/   local_path/   +rsync_long_args=--rsync-path="sudo rsync" --exclude-from=/etc/rsnapshot/exclude_path.list

# global exclusion list (directories never to be backed up)

exclude /proc/
exclude /sys/
exclude /dev/
exclude /run/
exclude /tmp/
First things first: I suggest to always use a non-root user (not even sudo, because that would be the same, right?) to execute rsnaspshot.
Make sure your user can write the lockfile and also the logfile (create paths where necessary)
Create the root dir (where to store your snapshots) with root, if necessary - (maybe inside /mnt/ ) - but give your user permissions to read and write afterwards.
Decide the number and frequency of your backups (daily, weekly and monthly is a sane default) - don't change the names “alpha, beta and gamma” in the config, because, as it is written in the comments: “Must be unique and in ascending order”
A simple backup line would be like:
backup /var/www/ local_path/
snapshot_rootIf you're backing up a direcory on a remote host, use the same syntax as the one for rsync. I also suggest making use of the ~/.ssh/config file to configure and shorten your ssh destinations (name, ports, keys).
Last piece I added in the backup line above in configuration file is used when you need to backup a directory with root permission. You can give the “normal” user “sudo” rights to use rsync command without entering a password on the remote host and then you can keep running rsnapshot locally without root
backupuser ALL=(ALL) NOPASSWD: /usr/bin/rsync
One big advice, if I may. Be sure to make an exclusion for the following directories when backing up a /home/user dir
*/go
*/node_modules
*/.cache
*/.npm
*/.nvm
*/.rustup
especially go/pkg directory creates a big mess because all of the files of the modules have no “write” (+w) permission set - for whatever reason they did it (I really don't understand this choice).. So after the first successful snap, on the second one, when the software will move e.g. alpha.0 to alpha.1, it won't have the permission to do so. It will fail and you'll need to fix it.
rsnapshot help
rsnapshot <alpha | beta | gamma> # manually execute one of the rsnapshots
rsnapshot configtest # syntax check
rsnapshot du # show disk usage for your backups
I'm using crontab to schedule rsnapshot, like this:
# Run rsnapshot alpha every day at 2:00 PM
0 14 * * * /home/roughnecks/scripts/rsnapshot-alpha.sh

# Run rsnapshot beta every monday at 3:00 PM
0 15 * * 1 /home/roughnecks/scripts/rsnapshot-beta.sh

# Run rsnapshot gamma the first of every month at 4:00 PM
0 16 1 * * /home/roughnecks/scripts/rsnapshot-gamma.sh
I actually run those mini shell scripts because I'm also sending notifications about successful/failed backups via ntfy
Here's one of them, the other ones are copy-pasted with different frequency:
#!/bin/bash

rsnapshot alpha

if [ $? -eq 0 ]; then
    curl -d "rsnapshot alpha successful! 😀" ntfy.myserver.tld:port/tag
else
    curl -d "rsnapshot alpha failed?! 🤔" ntfy.myserver.tld:port/tag
fi
That would be all. Hope it's been useful
Mostly a personal reminder about this cool way to share files on an XBackBone instance, like sharer
Download the .txt attachment.
Edit the example TXT, add your token to
"TOKEN HERE" and your domain to "DOMAIN.HERE".
Rename it to .json extension.
Download the app.
Open it and click the dots on the upper right.
Select "Import / Export".
Select import from file, and select the JSON file.
I've had my hands full in the last few weeks.. let's see what's new for @wpn
laltrowiki (our (me and old friends) wiki didn't really fit with @wpn - I'm keeping it for myself)
trilium (note-taking app which I kept on @wpn, but was only personal.. Now it's hosted at home)
grocy (pantry/shopping aid app, same as trilium above)
Have upgraded plugins for roundcube #webmail and FreshRSS, #RSS reader. Main services are always up-to-date, while these were some additions due from time to time.
Have done some tinkering with this blog's and xmpp-it homepage's #sqlite DBs: if you're interested, follow here
Have installed and then removed 2 #gemini to #html #proxies, because I believe the one I've been (and still am) using so far, is the best one. I also tweaked its stylesheet a bit. The two proxies I tried are september and kineto, while the one currently in use is loxy
I have first upgraded uptime-kuma to V2 Beta but then backed it up and moved to gatus, which lacks some features but it's also lightweight and straightforward. During the process we lost webhooks live notifications (about services status) for XMPP chatroom, so I have also installed ntfy server and related Android app, but, obviously, I'm currently the only one to see those. If any of @wpn users is interested, I can share info about the "topic", server's "address:port" and such. For the time being everything is in plain and without authentication.. Don't think that @wpn's services status notifications are so "sensible" info to require encryption, so I didn't even bother 😀
It's "6" already.. wow!
transmission-daemon was replaced by good-old rtorrent and that also got a web-ui, which only myself can access so far.
All of the aforementioned changes and fixes were mainly meant to reduce the load on the machine, in order to provide a better experience for everyone. Things still look complicated though, because even if there was a significant decrease in RAM usage, CPU, on the other side, seems almost worsened - and I still can't explain that, apart from thinking contabo maybe doing oversubscription of resources on their host.
Last 2 things, then I'll shut-up! 😁
Some of the users' home directories (only the ones which belongs to me or are system-related users account) are now backed-up via rsnapshot to my #homelab. I intend to write an how-to on that topic, further ahead in time, because I'm still testing/figuring it out.
The onboarding tool has got a new checkbox for (legal) age verification.
That's it. Feel free to tale a "tour" if you're new or haven't had the chance yet: https://woodpeckersnest.space/
See you soon!
Hello,
just a brief news that @wpn's fediverse client instance, powered by phanpy, has finally got (working) translations since the latest release, which I have built a few minutes ago. You do also keep the other features which were already available, like the GIFs picker.
If you happen to run into any issue, let me know. Thanks

It's officially pimped!!
Can't believe the time I spent fixing "homarr" progressive layout, almost breaking at each smallest change.
New @wpn's home is running "glance" and the whole site is just 1 .yml file, plus some custom CSS rules and assets (images). Took me ~2 evenings to set it up and it's looking quite good, in my opinion. It's light (actually it's dark-only 😀 ), fast, fully featured.
Unfortunately, you always have to touch it first hand to understand the wrong choices and remedy them; better late than never though!