Posts tagged with “prosody”

prosodyctl commands and examples

Written by Simone

prosodyctl shell

Launch the shell:

# prosodyctl shell

Delete pubsub node (the ">" sign at the beginning is important and also dangerous, as it lets you do anything!):

>prosody.hosts["pubsub.example.tld"].modules.pubsub.service:delete("blog", true)

Delete ALL pubsub nodes

>local service = prosody.hosts["pubsub.example.tld"].modules.pubsub.service; for node in pairs(select(2, assert(service:get_nodes(true)))) do service:delete(node, true); end

Check subscription by user:

>prosody.hosts["pubsub.example.tld"].modules.pubsub.service.subscriptions["user@example.tld"]

Change affiliation on pubsub nodes (make user owner):

>prosody.hosts["pubsub.example.tld"].modules.pubsub.service:set_affiliation("blog",true,"user@example.tld","owner")

Unsubscribe from node

>prosody.hosts["pubsub.example.tld"].modules.pubsub.service:remove_subscription("blog",true,"user@example.tld")

Subscribe to node

>prosody.hosts["pubsub.example.tld"].modules.pubsub.service:add_subscription("blog",true,"user@example.tld")

prosodyctl commands

Asking for help:

# prosodyctl shell help

# prosodyctl shell 'help SECTION'

Show all listening ports:

# prosodyctl shell port list

Show all http endpoints:

# prosodyctl shell http list

List registered users:

# prosodyctl shell user list example.tld

List existing MUCs:

# prosodyctl shell muc list [component name]

List connected clients:

# prosodyctl shell c2s show

Activate a component:

# prosodyctl shell host activate some.component.example.tld

Generate Invites: create a new invite using an ad-hoc command in an XMPP client connected to your admin account, or use the command line:

# prosodyctl mod_invites generate example.tld

Reset forgot passsword: "doesn't seem to work - see below"

# prosodyctl mod_invites generate example.tld --reset <USERNAME>

Automatic Certificates Import: prosodyctl has the ability to import and activate certificates in one command:

# prosodyctl --root cert import HOSTNAME /path/to/certificates

Certificates and their keys are copied to /etc/prosody/certs (can be changed with the certificates option) and then it signals Prosody to reload itself. –root lets prosodyctl write to paths that may not be writable by the prosody user, as is common with /etc/prosody. Multiple hostnames and paths can be given, as long as the hostnames are given before the paths.

This command can be put in cron or passed as a callback to automated certificate renewal programs such as certbot or other Let's Encrypt clients.

Import All:

# prosodyctl --root cert import /etc/letsencrypt/live

Reset forgot password

# prosodyctl install --server=https://modules.prosody.im/rocks/ mod_password_reset

Reload prosody configuration then use ad-hoc commands to generate a reset link for given JID

Some news for XMPP: support MUC and anonymous login

Written by Simone

Simple instructions on how to join @wpn's XMPP server  anonymously

More news on the previously announced bridge for support MUC: we got another bridge set up. This time around, IRC joins the ballet, so matterbridge is now bridging @wpn support MUC for 3 different protocols.. XMPP and MATRIX being the previous other two.

https://health.woodpeckersnest.space/

On this matter I was thinking about making a "tombstone" of the current XMPP MUC, which is called status and move to wpn - In fact that's the name of the MATRIX and IRC rooms. This is not really something I want to do soon, though, because it implies changing several things.

Last, but not least, I have also set up an anonymous VirtualHost in Prosody. You can now login to anon.woodpeckersnest.space with a disposable account (whose data gets deleted from the server as soon as the account is not connected anymore) and participate/discuss in @wpn MUCs - access to external servers is not permitted to anonymous users, for obvious security concerne.

You can follow the steps in this GIF to connect anonymously with Gajim; Dino should also support it but I don't know how it's done.. Finally if you want to join via Android, these are the instructions provided by Daniel Gultsch, from Conversations IM:

you can just add the account something@anon.woodpeckersnest.space with an empty password to #Conversations_im and it will login anonymously. Anonymous logins don't require registration. When I say 'something@anon...' you can use anything as that username. Doesn't matter (it's only used to get through the client side jid validation check)

TIP: If the server tells you can't join a MUC, make sure you have added a nickname in your profile's details (Android).

It was about time!

Written by Simone

screenshot of the converse.js webchat login screen, featuring the new cyberpunk theme with different shades of violet and purple colors

@wpn has got a new HTTP HOST for its XMPP server's..:

  • ..web-based chat, powered by converse.js,
  • file upload,
  • MUCs' pastebin,
  • password_reset/invite/registration pages.

Webchat is now located at https://xmpp.woodpeckersnest.space/conversejs - only @wpn accounts can login to it.

In other news, converse.js was recently upgraded and it's now running on the main git branch code, so you can preview the featured "cyberpunk" theme in action, which will be released "soon".

Modding converse.js

Written by Simone

Here are a few tweaks that make my "converse.js" experience better:

Remove link from banner: I accidentally used to click that and be teleported to converse.js official webclient, so I thought it could be misleading for unaware users using my locally hosted version of the software.

Search and replace/remove the href bit in converse.min.js, under the dist directory:

<a class="brand-heading" href="https://conversejs.org" target="_blank" rel="noopener">

In the "converse.min.css" file, search for this string and fill it with the following code to have unread MUCs underlined and colored in red:

.list-item.unread-msgs

.list-item.unread-msgs{font-weight:700; text-decoration: underline red;}

Fix color for toolbar-utilities when in 1:1 chats: find this line in "converse.min.css"

.fas:hover svg{fill:var(--chat-head-color)}

and replace with:

.fas:hover svg{fill:var(--chat-toolbar-btn-color)}

Raise minimum chat text area: find this bit in "converse.min.css"

min-height:var(--chat-textarea-height);

and replace with custom value in pixels, e.g.

min-height:120px;

Set a smaller line height for chats list: find the first occurrence of this code in "converse.min.css"

.conversejs .items-list .list-item

and continue until you find:

height:2.5em

substitute it with something like height:2.0em

Removing a space in quoted reply for "actions" plugin: find the following string in your conversejs/dist/plugins/actions/action.js

return ">" + nick + ' : '

remove the offending space

return ">" + nick + ': '

Changing from :smiley: to :thumbsup: emoji for the "Like" actions plugin function: find the following string in your conversejs/dist/plugins/actions/action.js

actions_reactions: [
                                    {name: 'like', label: 'Like', emoji: ':smiley:', icon_class: 'fa fa-check'},

and replace with:

actions_reactions: [
                                    {name: 'like', label: 'Like', emoji: ':thumbsup:', icon_class: 'fa fa-check'},

Fix background-color for screencast plugin icon: replace the class in row #25 in screencast.js

<button class="plugin-screencast"

<button class="btn"

Hats!

Written by Simone

In XMPP you can have "hats"! A hat is basically a label next to your nickname which can show maybe a role you have in a particolar MUC (e.g. "teacher" for a class, "manager" for an office, or "developer" for a software project and so on..). The relative XEP is https://xmpp.org/extensions/xep-0317.html

The only client where this XEP seems to be manageable, is conversejs: https://m.conversejs.org/docs/html/configuration.html#muc-hats but Cheogram can show hats as well in the participant list.

There are a couple modules needed in prosody and you can install them like so:

prosodyctl install --server=https://modules.prosody.im/rocks/ mod_muc_hats_api
prosodyctl install --server=https://modules.prosody.im/rocks/ mod_muc_hats_adhoc

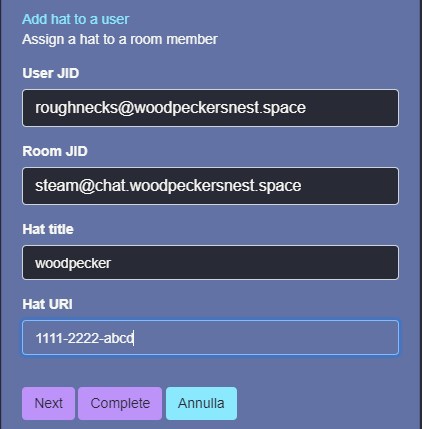
This is the adhoc command in conversejs to set a hat:

You need to specify a user JID, a room JID (on your server), a Hat title (the actual label you want to be shown) and a Hat URI (a machine-readable unique identifier, like 1111-2222-abcd - this is something you make up yourself)

And this is the final outcome

conversejs community plugins

Written by Simone

Thanks to Zash and Jcbrand in the "Converse" MUC and a bit of hacking I was able to set up a few community plugins for my conversejs install as a prosody module.

Here's the configuration in /etc/prosody/prosody.cfg.lua:

conversejs_resources = "/usr/local/lib/prosody/modules/mod_conversejs/dist"
conversejs_tags = {
        -- Load favicon
        [[<link rel="shortcut icon" href="https://woodpeckersnest.space/images/converse-js.ico">]];
        -- Load libsignal-protocol.js for OMEMO support (GPLv3; be aware of licence implications)
        [[<script src="https://cdn.conversejs.org/3rdparty/libsignal-protocol.min.js"></script>]];
        -- Load community plugins
        [[<link type="text/css" rel="stylesheet" media="screen" href="conversejs/dist/plugins/search/search.css" />]];
        [[<script src="conversejs/dist/plugins/actions/actions.js"></script>]];
        [[<script src="conversejs/dist/plugins/search/search.js"></script>]];
        [[<script src="conversejs/dist/plugins/search/jspdf.debug.js"></script>]];
        [[<script src="conversejs/dist/plugins/search/jspdf.plugin.autotable.js"></script>]];
        [[<script src="conversejs/dist/plugins/toolbar-utilities/toolbar-utilities.js"></script>]];
        [[<script src="conversejs/dist/plugins/screencast/screencast.js"></script>]];
}

conversejs_options = {
        locked_domain = "woodpeckersnest.space";
        auto_focus = true;
        view_mode = "fullscreen";
        allow_registration = false;
        auto_reconnect = true;
        reuse_scram_keys = true;
        muc_clear_messages_on_leave = true;
        clear_cache_on_logout = false;
        play_sounds = true;
        whitelisted_plugins = {"actions", "search", "toolbar-utilities", "screencast"};
}

You'll have to copy the plugins directories (actions, search etc..) in this path:

/usr/local/lib/prosody/modules/mod_conversejs/dist/plugins/

Then reload configuration and conversejs module or restart prosody.

Already found a bug in "toolbar-utilities" and haven't still had a chance to try the screencast plugin, but they look good for the most part.

Maybe I will add Jitsi Meet or Voice Chat at some point.. Not now though. ¹

EDIT: screencast is working alright, but not in the way you'd expect it. It's not a live streaming, instead it's a recording of your screen which gets uploaded once you stop the cast.. I wouldn't say it's perfect but not even bad.

¹ I've added them 😛

Prosody invite page's example with custom apps

Written by Simone

Picture shows 4 XMPP apps with their logos and brief description.

Different apps manually registered in "mod_register_apps.lua" ranging from web apps like Movim, to F-Droid apps like monocles chat and Cheogram.

See also F-Droid app code example

mod_register_apps.lua - f-droid app example

Written by Simone

Here's how you add an F-Droid XMPP App to "mod_register_apps.lua" so that it shows up in the Invite registration page of prosody:

        {
                name = "monocles chat";
                text = [[monocles chat is a fork of blabber.im and Conversations with some changes, to improve usability.]];
                image = "assets/logos/monocles.png";
                link = "https://f-droid.org/packages/de.monocles.chat/";
                platforms = { "Android" };
                supports_preauth_uri = true;
                download = {
                        buttons = {
                                {
                                        image = "https://woodpeckersnest.space/images/fdroid.png";
                                        url = "https://f-droid.org/packages/de.monocles.chat/";
                                };
                        };
                };
        };

Add the "monocles.png" logo to your "assets/logos/" directory and change the "fdroid.png" image link accordingly.