Posts tagged with “shell”

prosodyctl commands and examples

Written by Simone

prosodyctl shell

Launch the shell:

# prosodyctl shell

Delete pubsub node (the ">" sign at the beginning is important and also dangerous, as it lets you do anything!):

>prosody.hosts["pubsub.example.tld"].modules.pubsub.service:delete("blog", true)

Delete ALL pubsub nodes

>local service = prosody.hosts["pubsub.example.tld"].modules.pubsub.service; for node in pairs(select(2, assert(service:get_nodes(true)))) do service:delete(node, true); end

Check subscription by user:

>prosody.hosts["pubsub.example.tld"].modules.pubsub.service.subscriptions["user@example.tld"]

Change affiliation on pubsub nodes (make user owner):

>prosody.hosts["pubsub.example.tld"].modules.pubsub.service:set_affiliation("blog",true,"user@example.tld","owner")

Unsubscribe from node

>prosody.hosts["pubsub.example.tld"].modules.pubsub.service:remove_subscription("blog",true,"user@example.tld")

Subscribe to node

>prosody.hosts["pubsub.example.tld"].modules.pubsub.service:add_subscription("blog",true,"user@example.tld")

prosodyctl commands

Asking for help:

# prosodyctl shell help

# prosodyctl shell 'help SECTION'

Show all listening ports:

# prosodyctl shell port list

Show all http endpoints:

# prosodyctl shell http list

List registered users:

# prosodyctl shell user list example.tld

List existing MUCs:

# prosodyctl shell muc list [component name]

List connected clients:

# prosodyctl shell c2s show

Activate a component:

# prosodyctl shell host activate some.component.example.tld

Generate Invites: create a new invite using an ad-hoc command in an XMPP client connected to your admin account, or use the command line:

# prosodyctl mod_invites generate example.tld

Reset forgot passsword: "doesn't seem to work - see below"

# prosodyctl mod_invites generate example.tld --reset <USERNAME>

Automatic Certificates Import: prosodyctl has the ability to import and activate certificates in one command:

# prosodyctl --root cert import HOSTNAME /path/to/certificates

Certificates and their keys are copied to /etc/prosody/certs (can be changed with the certificates option) and then it signals Prosody to reload itself. –root lets prosodyctl write to paths that may not be writable by the prosody user, as is common with /etc/prosody. Multiple hostnames and paths can be given, as long as the hostnames are given before the paths.

This command can be put in cron or passed as a callback to automated certificate renewal programs such as certbot or other Let's Encrypt clients.

Import All:

# prosodyctl --root cert import /etc/letsencrypt/live

Reset forgot password

# prosodyctl install --server=https://modules.prosody.im/rocks/ mod_password_reset

Reload prosody configuration then use ad-hoc commands to generate a reset link for given JID

Notes

Written by Simone

I'll update this post whenever I see fits, A.K.A. when I have other bits of information which don't require a whole post.

Operations on files and directories

Move files to the current/parent directory in Linux

Current dir

find . -type f -exec mv {} . \;

Parent dir

find . -type f -exec mv {} .. \;

Recursive chmod on files and dirs

To change all the directories to 755 (-rwxr-xr-x):

find /var/www/blog -type d -exec chmod 755 {} \;

To change all the files to 644 (-rw-r--r--):

find /var/www/blog -type f -exec chmod 644 {} \;

Certbot

Certbot cli

/etc/letsencrypt/cli.ini

When renewing, use the same private key as the existing certificate. (default: False):

reuse-key = True

Common commands

Register single domain:

certbot certonly --standalone -d domain.tld --dry-run
  • Remove “–dry-run” when ok.

Renew single domain:

certbot renew --cert-name domain.tld --dry-run
  • Remove “–dry-run” when ok.

Revoke certificate:

certbot revoke --cert-path /etc/letsencrypt/archive/${YOUR_DOMAIN}/cert1.pem

Check certificate's expiry date:

cat /etc/letsencrypt/live/domain.tld/cert.pem | openssl x509 -noout -enddate

GIT

To reset your git repository to given commit id, do:

git reset --hard <commit-id>
git push origin master --force

Ignoring files that are already tracked

git update-index --assume-unchanged <your file here>

Delta Chat Mail sieve

require ["fileinto"];
# rule:[DeltaChat]
if header :contains "Chat-Version" "1.0"
{
	fileinto "DeltaChat";
	stop;
}

Postfix mail queue

To view postfix mail queue in case of problems and remove a particular message from it, do as follows:

# mailq

-Queue ID-  --Size-- ----Arrival Time---- -Sender/Recipient-------
6DCF32201B*    4824 Thu Oct 19 22:54:44  roughnecks@woodpeckersnest.eu
                                         debian@spacenet.it

-- 4 Kbytes in 1 Request.
# postsuper -d 6DCF32201B

postsuper: 6DCF32201B: removed
postsuper: Deleted: 1 message

To delete all emails in the queue, use this command:

# postsuper -d ALL

Check Preferred Outgoing IP (when multiple are set on <interface>)

curl ifconfig.me

The correct command to add a new Linux user (in this case without a shell)

adduser --shell /usr/sbin/nologin <username>

I always forget which command is the complete one, useradd or adduser

Downtimes

Written by Simone

It's been a few days now that I'm experiencing downtimes at night, early mornings.

When I wake up, connect to the VPS and attach to tmux, I am welcomed by these messages in console:

        Message from syslogd@pandora at Nov 3 05:37:13 ...
        kernel:[1586232.350737] Dazed and confused, but trying to continue

        Message from syslogd@pandora at Nov 3 05:37:24 ...
        kernel:[1586235.049143] Uhhuh. NMI received for unknown reason
        30 on CPU 1.

        Message from syslogd@pandora at Nov 3 05:37:24 ...
        kernel:[1586235.049145] Dazed and confused, but trying to continue

        Message from syslogd@pandora at Nov 3 05:37:55 ...
        kernel:[1586273.642163] watchdog: BUG: soft lockup - CPU#2 stuck
        for 27s! [dockerd:526408]

        Message from syslogd@pandora at Nov 3 05:38:00 ...
        kernel:[1586278.545172] watchdog: BUG: soft lockup - CPU#1 stuck
        for 24s! [systemd-journal:257]

        Message from syslogd@pandora at Nov 3 05:38:02 ...
        kernel:[1586281.187611] watchdog: BUG: soft lockup - CPU#3 stuck
        for 35s! [lua5.4:1702]

There's no need to say that when this happens, the server is completely frozen and doesn't respond to anything.

I already contacted support, but they didn't investigate at all, I believe. They manually restarted my VPS once and did some pings and connection tests (VNC, SSH) afterwards.. "everything is working fine!"

This last Saturday I was up when it happened, so I did a mtr from my PC to the VPS's IP and logged it, then I sent another email with the output to support.. Still waiting for them to reply, I guess tomorrow (Monday).

Friends like lorenzo and shai are having difficulties too, with the same provider, so I'm not imagining things.

Well, that's all I got to say, will keep you posted if any news.

@wpn onboarding: updates

Written by Simone

I was running 2 separate apps for shell/XMPP account registration at @wpn, so far..

This night I made some changes to the original code (provided by Schimon) and I got just one app with account choice - meaning that you must choose what account type you want in the form. Shell accounts are for friends only, as it's always been.

As a consequence of that, I shut down the old address for XMPP account onboarding and left only the main one, which is:

https://hello.woodpeckersnest.space/

gemlog

gemini protocol - no, it's not stuff by google

Written by Simone

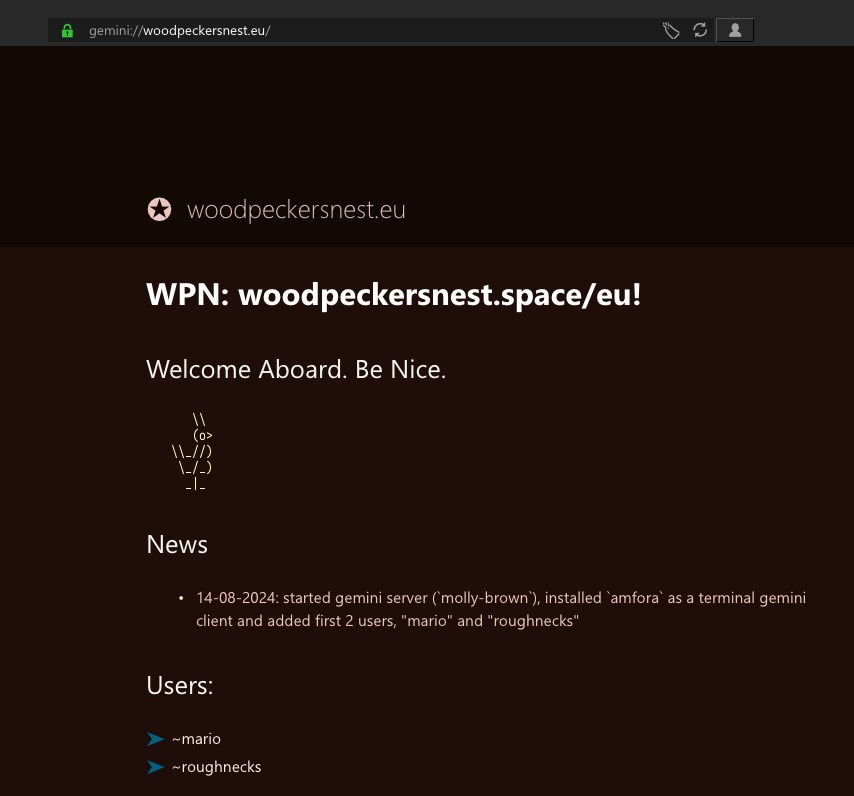
I'm glad to announce the start of a new gemini server here at WPN, only for shell users:

gemini://woodpeckersnest.eu/

Gemini is an application-layer internet communication protocol for accessing remote documents, similar to HTTP and Gopher. It comes with a special document format, commonly referred to as "gemtext", which allows linking to other documents. Started by a pseudonymous person known as Solderpunk, the protocol is being finalized collaboratively and as of October 2022, has not been submitted to the IETF organization for standardization.

You need a "gemini" client to be able to open that link, the same way you need a browser to open this blog post; I can recommend Lagrange: choose your flavor ^^

The server is powered by molly-brown, author "solderpunk". Thanks

Onboarding

Written by Simone

Hello,

this is "Opening Day": finally decided to open fully featured shell accounts' registration on WPN: woodpeckersnest.space/eu for friends.

Who are friends then? Since IRL friends have zero interest in this, my friends are people I know and respect over the Internet, in particular - but not limited to - the XMPP network. They are mostly Italian and English speaking folks, since those are the only 2 languages I know..

This is a first-time experience for me, so give me a few days (a week maybe) to "adjust" and set account(s) up.

If you feel lucky, click the title of this post and apply now! 😏

Wireguard IPv6

Written by Simone

Here's my configuration, working fine with my Android 9 Phone

server.conf

root@pandora:~# cat /etc/wireguard/wg0.conf
[Interface]
# specify generated private key for server
PrivateKey = <sekret>
# IP address for VPN interface
Address = 172.16.100.1/32, fd42:42:42::1/64
MTU = 1420
# UDP port WireGuard server listens
ListenPort = 51820

# possible to set any commands after WireGuard starts/stops
# set routing rules like follows to access to local network via VPN session
PostUp = iptables -A FORWARD -i wg0 -j ACCEPT; iptables -t nat -A POSTROUTING -o eth0 -j MASQUERADE; ip6tables -A FORWARD -i wg0 -j ACCEPT; ip6tables -t nat -A POSTROUTING -o eth0 -j MASQUERADE;
PostDown = iptables -D FORWARD -i wg0 -j ACCEPT; iptables -t nat -D POSTROUTING -o eth0 -j MASQUERADE; ip6tables -D FORWARD -i wg0 -j ACCEPT; ip6tables -t nat -D POSTROUTING -o eth0 -j MASQUERADE;

[Peer]
# REDMI
# specify public key for client
PublicKey = <sekret>
# clients' VPN IP addresses you allow to connect
# possible to specify subnet ⇒ [172.16.100.0/24]
AllowedIPs = 172.16.100.6/32, fd42:42:42::6/128
PersistentKeepalive = 25

client.conf

root@pandora:~# cat /etc/wireguard/redmi.conf
[Interface]
#Private IP Address
Address = fd42:42:42::6/128, 172.16.100.6/32
#Client's Private Key
PrivateKey = <sekret>
#Server's listening port
ListenPort = 51820

[Peer]
#Server's Public Key
PublicKey = <sekret>
AllowedIPs = ::0/0, 0.0.0.0/0
#Server's IP:port
Endpoint = woodpeckersnest.space:51820

sysctl.conf

root@pandora:~# sysctl -p
net.ipv4.ip_forward = 1
net.ipv6.conf.all.forwarding = 1
net.ipv6.conf.eth0.accept_ra = 2

Process Keepalive

Written by Simone

Scope: restart a process if it exited for any reason

To do: edit "process-restart.sh" substituting "process" with the actual process name and startup command/path. Moreover you'd want to rename both file with the process name. To find what the actual process name is, do a ps aux | grep <name> and then test with pgrep -f <process_you_found> - see if it returns the correct PID.

Usage: run ./process-loop.sh

TIP: always use TMUX or screen.

I'm using this method to keep my bots¹ and the ETS2 server always running:

¹ BOTS == ZED, a couple XMPP bots, Simplebot Mastodon etc..

File attachment:

process-keepalive.zip (0.5 KB)

Going without casters

Written by Simone

I had previously discussed this issue on XMPP and on my Schleuder Mailing List, but there's news.

My ".space" domain is blacklisted by Google and others top email services because it is considered spammy - I still don't understand how you can blacklist a whole tld for spam but that's how it goes..

So I purchased a new ".eu" domain and set it up as virtual host in postfix.. But I was still using a third party relay to deliver emails to Gmail, Hotmail and iCloud. This relay works with "credits", each email you send using their free service is equal to 1 credit and you get 1000 credits per month (BIG Thanks to Kévin from Delta Chat for helping me out with this).

Now, I haven't ever reached the maximum allowed quota but I felt like removing the casters at least for Gmail, since this .eu domain should do the job just fine and because I cannot actually remove Hotmail, since they have my server IP banned for whatever reason.

So, I removed the gmail line in my transport file for postfix, ran postmap and reloaded postfix.service. Finally I sent a Ping over to "Delta Chat Italian Offtopic Group" where there are 2 people with gmail accounts and everything was fine, no email returned back to sender.

I'll keep going like this until problems!!

Now, if anyone is interested on how my transport file looks like, I'll share 😀

outlook.com smtp:[outbound.mailhop.org]:587
hotmail.com smtp:[outbound.mailhop.org]:587
outlook.fr smtp:[outbound.mailhop.org]:587
hotmail.it smtp:[outbound.mailhop.org]:587
mail.icloud.com smtp:[outbound.mailhop.org]:587
*   :

You need an account on DuoCircle and you need to authenticate yourself (in postfix) for their smtp to accept emails from your server.

Wireguard Configuration

Written by Simone

wg0.conf

[Interface]
# specify generated private key for server
PrivateKey = <privkey>
# IP address for VPN interface
Address = 172.16.100.1/32
MTU = 1420
# UDP port WireGuard server listens
ListenPort = 51820

# set routing rules like follows to access to local network via VPN session
PostUp = iptables -A FORWARD -i wg0 -j ACCEPT; iptables -t nat -A POSTROUTING -o ens3 -j MASQUERADE
PostDown = iptables -D FORWARD -i wg0 -j ACCEPT; iptables -t nat -D POSTROUTING -o ens3 -j MASQUERADE
# change "ens3" with your interface

[Peer]
# specify public key for client
PublicKey = <pubkey>
# clients' VPN IP addresses you allow to connect
# possible to specify subnet ⇒ [172.16.100.0/24]
AllowedIPs = 172.16.100.6

client.conf

[Interface]
# Private IP Address
Address = 172.16.100.6/32
# Client's Private Key
PrivateKey = <privkey>
# Server's listening port
ListenPort = 51820

[Peer]
# Server's Public Key
PublicKey = <pubkey>
AllowedIPs = 0.0.0.0/0
# Server's IP:port
Endpoint = 51.195.43.203:51820

If you want to scan a QR code on your phone to load the client.conf, do as follows: # apt install qrencode $ qrencode -t utf8 < client.conf

A QR code will appear, scan it.

Thanks to "to_red" for helping me out with the configuration 😉