Posts tagged with “WebDAV”

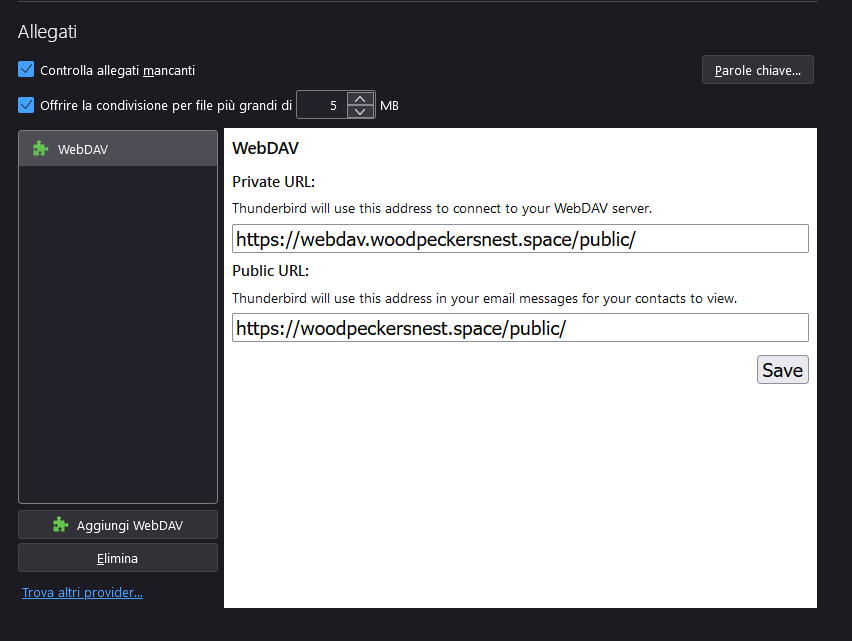
More on WebDAV - Connecting a remote WebDAV folder in Windows

Written by Simone

After some failed attempt at this, I think I found the right way to "mount" a remote WebDAV folder under Windows' Explorer.

Initially my baby steps took me here: https://note.woodpeckersnest.space/share/0TJT81fgI8Jy

After following that tutorial I didn't succeed, so I investigated further. I can say that everythig looks correct until you get to point 9.

The address they tell you have to enter isn't correct in my experience and they aren't even using https for the URL. What worked for me was instead something like:

\\webdav.woodpeckersnest.space@SSL\folder

You have to input the network-path-stile address which is common in Windows, as in: double backslash, FQDN of your WebDAV server, "@SSL" and then the path (folder) where you have access to files in your WebDAV server, with a backslash preceding it.

That's it, a prompt will ask for username and password and then a new Network Path (WebFolder) will be connected in Explorer, just below your local drives.

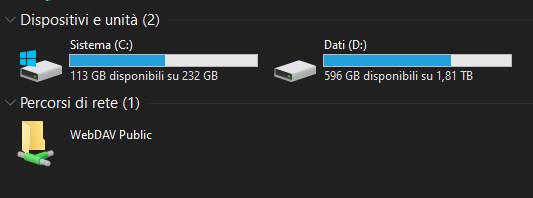
You can then browse, copy, upload, delete (and so on) whatever content you like.

EDIT: Just found out I couldn't rename files/folders from Windows or Total Commander (Android)

Fixed by setting nginx virtualhost like this:

server {
    listen 443 ssl http2;
    listen [::]:443 ssl http2;
    server_name  webdav.woodpeckersnest.space;


    # HTTPS configuration
    ssl_certificate /etc/letsencrypt/live/webdav.woodpeckersnest.space/fullchain.pem;
    ssl_certificate_key /etc/letsencrypt/live/webdav.woodpeckersnest.space/privkey.pem;

    access_log /var/log/nginx/webdav/access.log;
    error_log /var/log/nginx/webdav/error.log;

  location / {
    set $destination $http_destination;

    if ($destination ~* ^https(.+)$) {
         set $destination http$1;
    }

    proxy_set_header   Destination $destination;
    proxy_set_header   X-Real-IP $remote_addr;
    proxy_set_header   X-Forwarded-For $proxy_add_x_forwarded_for;
    proxy_set_header   Host $host;
    proxy_pass         http://127.0.0.1:17062/;
    proxy_http_version 1.1;
    proxy_set_header   Upgrade $http_upgrade;
    proxy_set_header   Connection "upgrade";
  }

  client_max_body_size 0;

}

Now I'm quite happy 😀

Sharing big files with Thunderbird filelink on self-hosted webdav

Written by Simone

Thunderbird filelink with self-hosted webdav

Me and friends on xmpp:lozibaldone@conference.xmpp-it.net?join had a discussion about big attachments in Thunderbird and one person ("idice"), which I thank, suggested to use (long forgotten by me) Thunderbird's "filelink" functionality.

filelink lets you upload your big attachments to the cloud and send a link to download them, to your email contact. For it to work, you have to download an extension for Thunderbird and choose a cloud instance.

There are a few in the community, ranging from Dropbox, to Nectcloud and webdav. I chose webdav, because I already have a docker container with a running instance.

The tricky part in setting the extension up and working with my server was to have a private and a public URLs: you have credentials for webdav, so the private one is easily accomplished, while I had never thought about having a public site to share stuff without authentication; and in the end it was really straightforward.

What I did was basically: mount a volume in docker where I want to publish stuff to be shared. So at first when uploading I'm asked for credentials and everything just works.. files go to the volume.

Then, to have people access those files, I simlinked (ln -s) the docker volume dir to a path under my main site's virtualhost in nginx. Like:

My site is in /var/www/html/, so I changed dir to that location and:

ln -s /path/to/public-docker-volume/ public

Now I have a /public/ dir in my website with all the files that I publish in webdav and since index is off in nginx, you can't just browse it - you have to know the exact file name to access it.

And that's it.

Now for the Thunderbird setup, I'll show a few shots. For starters, this is the extension I used: https://addons.thunderbird.net/it/thunderbird/addon/filelink-provider-for-webdav/

This is the "attachments" settings in Thunderbird, the only place where you configure the extension:

As you can see it asks for a private and a public URLs, as explained before.

When you compose a new message, go to the attachments menu as always and you'll find a new item, called Filelink - WebDAV:

Click it and select your attachment from disk. It will ask for a username and password (those you set up for webdav in docker) and will begin uploading the file.

Then you'll see the message being populated like this:

It says:

I have linked 1 file to this email:

  • mibunny.png

    Size: 408 KB

    Link: the link

If you keep uploading files, the number in the first row will be automatically incremented and there will be another file section with new info about it.

And.. we're done!? 😀

If you got any question, leave a comment down below.