More news on the previously announced bridge for support MUC: we got another bridge set up. This time around, IRC joins the ballet, so matterbridge is now bridging @wpn support MUC for 3 different protocols.. XMPP and MATRIX being the previous other two.
https://health.woodpeckersnest.space/
On this matter I was thinking about making a "tombstone" of the current XMPP MUC, which is called status and move to wpn - In fact that's the name of the MATRIX and IRC rooms. This is not really something I want to do soon, though, because it implies changing several things.
Last, but not least, I have also set up an anonymous VirtualHost in Prosody. You can now login to anon.woodpeckersnest.space with a disposable account (whose data gets deleted from the server as soon as the account is not connected anymore) and participate/discuss in @wpn MUCs - access to external servers is not permitted to anonymous users, for obvious security concerne.
You can follow the steps in this GIF to connect anonymously with Gajim; Dino should also support it but I don't know how it's done.. Finally if you want to join via Android, these are the instructions provided by Daniel Gultsch, from Conversations IM:
you can just add the account something@anon.woodpeckersnest.space with an empty password to #Conversations_im and it will login anonymously.
Anonymous logins don't require registration. When I say 'something@anon...' you can use anything as that username. Doesn't matter (it's only used to get through the client side jid validation check)
TIP: If the server tells you can't join a MUC, make sure you have added a nickname in your profile's details (Android).
It's been a few days now that I'm experiencing downtimes at night, early mornings.
When I wake up, connect to the VPS and attach to tmux, I am welcomed by these messages in console:
        Message from syslogd@pandora at Nov 3 05:37:13 ...
        kernel:[1586232.350737] Dazed and confused, but trying to continue

        Message from syslogd@pandora at Nov 3 05:37:24 ...
        kernel:[1586235.049143] Uhhuh. NMI received for unknown reason
        30 on CPU 1.

        Message from syslogd@pandora at Nov 3 05:37:24 ...
        kernel:[1586235.049145] Dazed and confused, but trying to continue

        Message from syslogd@pandora at Nov 3 05:37:55 ...
        kernel:[1586273.642163] watchdog: BUG: soft lockup - CPU#2 stuck
        for 27s! [dockerd:526408]

        Message from syslogd@pandora at Nov 3 05:38:00 ...
        kernel:[1586278.545172] watchdog: BUG: soft lockup - CPU#1 stuck
        for 24s! [systemd-journal:257]

        Message from syslogd@pandora at Nov 3 05:38:02 ...
        kernel:[1586281.187611] watchdog: BUG: soft lockup - CPU#3 stuck
        for 35s! [lua5.4:1702]
There's no need to say that when this happens, the server is completely frozen and doesn't respond to anything.
I already contacted support, but they didn't investigate at all, I believe. They manually restarted my VPS once and did some pings and connection tests (VNC, SSH) afterwards.. "everything is working fine!"
This last Saturday I was up when it happened, so I did a mtr from my PC to the VPS's IP and logged it, then I sent another email with the output to support.. Still waiting for them to reply, I guess tomorrow (Monday).
Friends like lorenzo and shai are having difficulties too, with the same provider, so I'm not imagining things.
Well, that's all I got to say, will keep you posted if any news.
I am most productive at night, when there is finally silence - apart from background music. The last couple hours of this Wednesday brought some nice additions to the @wpn support MUC:
- chat is not XMPP only anymore, but it got bridged to Matrix, via "matterbridge".
- a bot is now sending "BOFH excuses" to the chat, once a day.
XMPP MUC can be reached from: https://invite.woodpeckersnest.space/#status@chat.woodpeckersnest.space?join
Matrix room can be reached from: https://matrix.to/#/#wpn:matrix.org
Bridged chat means that everything being written in any of those rooms, gets relayed to the other by bots: there are in fact 2 bots connected to the 2 rooms, one is an XMPP bot and the other is a Matrix one, operated by "matterbridge", as I said earlier.
About "BOFH excuses", they are some fortune cookies from the relative Linux package, which are all about "Bastard Operators From Hell" excuses.. They are some short funny sentences about IT which an imaginary Operator (sysop, sysadmin, you name it) could say as excuse to justify issues.
Example?
BOFH excuse #266:
All of the packets are empty.
I have the same script running on gemini, at gemini://woodpeckersnest.space/cgi-bin/bofh
Basically it's some python spaghetti which runs the fortune command, does some formatting to the resulting text and sends it over gemini, or in the case of @wpn chat, over webhook to one other bot, which then posts its content to XMPP. It's more complicated to explain than do it 😀
P.S. @wpn support MUC is not publicly listed, so even if I'm posting links which may be used to join it, it should be treated as limited to @wpn users only.
gemlog
Last evening, at around 22:00 CET, Contabo migrated my VPS from old Hub at Nuremberg to the newly built "Hub Europe".
They rebooted it and everything came back up as usual.. I wasn't at home when it happened, didn't even notice anything until I connected and found no tmux session running. Even my phone which was connected to wireguard, quietly continued working and sending notifications 😎
Meanwhile, my friends and I watched "The Creator" on Disney+
Can't really say I do recommend it, but for some casual evening/entertainment, it wasn't half bad.
gemlog
I've been rethinking about the publication license of these blog posts.
Changes I made:
- Some "public" posts were turned to "CC BY-NC-SA"
- Some "all-rights-reserved" posts were turned to "CC BY-NC-SA"
At the moment there are still other public and all-rights-reserved posts.. Most of the public ones are from me, while some are from friends who told me to publish them with such license.
The all-rights-reserved ones are mostly from content I grabbed over the net and published here, where I wasn't able to contact the original authors (so credits are to themselves) and some others are e.g. posts with pictures I took myself.
So.. From now on, all these types of licenses will co-exist and each post will be tagged with the correct/relative one (hopefully).
Disclaimer: If not specified, you can assume it's "CC BY-NC-SA" by Simone "roughnecks" Canaletti
https://creativecommons.org/licenses/by-nc-sa/4.0/
You can try this script on #fediverso at irc.libera.chat, where me, cage, ndo and other friends hang out
bot: "verne", running on @wpn
SearXNG instance: https://search.woodpeckersnest.space/
Thanks to cage for the script and ndo for creating the channel o/
# © cage released under CC0, public domain
# https://creativecommons.org/publicdomain/zero/1.0/

# Date: 16-08-2024
# Version: 0.1

# Package description: do a web search using your searxng instance
# Public ones won't probably work because of "limiter"

# Authorize your channel from the partyline with:
# .chanset +searxng #your-channel

# Do a search
# .search <query> | .search paris (this query goes to default engine)
# .search +<engine> <query> | .search +wp paris (this query goes to
# wikipedia)
# .search !images paris | this query search only paris' images

# List of engines: https://docs.searxng.org/user/configured_engines.html

# tcllib is required

############## configuration directives ############################

# url of the HTTP(S) server of the search engine

set searxconfig(website_url)    "https://example.com/searxng"

# serach command to trigger the search

set searxconfig(cmd)            ".search"

# default search engine

set searxconfig(default_engine) "ddg"

# maximum number of search results printed

set searxconfig(max_results)    3

# time tracker file
# NB: when this script runs any file with the same name within the path in the
# working  directory  (depending of  what  is  considered the  working
# directory of the script) will be erased and overwritten!

set searxconfig(file_millis)    "searx_millis.tmp"

# Minimum search frequency in milliseconds.
# This is  the minimum  time that must  pass between  two consecutive
# search

set searxconfig(max_freq)       30000

############## configuration ends here #############

# tcllib is required
package require csv

setudef flag searxng

if { !([info exists searxconfig(lastmillis)]) } {
    set searxconfig(lastmillis) 0
}

bind pub - $searxconfig(cmd) search:searxng

proc send_message {message} {
    putserv "PRIVMSG $message"
}

proc slurp_file {path} {
    set fp [open $path r]
    set file_data [read $fp]
    close $fp
    return $file_data
}

proc process_csv {csv channel} {
    global searxconfig
    set rows [split $csv "\n"]
    set count 0
    #remove the header
    set rows [lrange $rows 1 [llength $rows]]
    if {[llength $rows] < 1} {
        send_message "$channel :Something gone wrong."
    } else {
        foreach row $rows {
            if {$count < $searxconfig(max_results)} {
                set row_splitted [csv::split $row]
                set title [lindex $row_splitted 0]
                set url   [lindex $row_splitted 1]
                send_message "$channel :$title $url"
                incr count
            } else {
                break
            }
        }
    }
}

proc encode {query} {
    set query [regsub -all { } $query "%20"]
    set query [regsub -all {&} $query "%26"]
    set query [regsub -all {=} $query "%3D"]
    set query [regsub -all {!} $query "%21"]
}

proc get_query_results {engine query} {
    global searxconfig
    set query [encode $query]
    set engine [encode $engine]
    set url "$searxconfig(website_url)search?q=$query&format=csv&engines=$engine"
    ## decomment the line below for debugging purposes
    # putlog $url
    return [exec curl -sS $url]
}

proc get_last_millis { } {
    global searxconfig
    if {[file exists $searxconfig(file_millis)]} {
        set searxconfig(lastmillis) [slurp_file $searxconfig(file_millis)]
    } else {
        set fp [open $searxconfig(file_millis) w]
        puts $fp 0
        close $fp
        get_last_millis
    }
}

proc set_last_millis { } {
    global searxconfig
    set fp [open $searxconfig(file_millis) w]
    puts $fp [clock milliseconds]
    close $fp
}

proc search:searxng {nick host hand chan text} {
    global searxconfig

    if {!([channel get $chan searxng])} {
        send_message "$chan :This script has not been authorized to run in this channel."
        return 0
    }

    set millis [clock milliseconds]

    get_last_millis

    if { [expr $millis - $searxconfig(lastmillis)] > $searxconfig(max_freq) } {
        ## test antiflood superato

        set_last_millis

        set text_splitted [split $text " {}"]
        set engine [lindex $text_splitted 0]
        set text_length [llength $text_splitted]
        set query [lrange $text_splitted 1 $text_length]


        if {![regexp {^\+} $engine]} {
            set engine $searxconfig(default_engine)
            set query $text_splitted
        } else {
            set engine [string range $engine 1 [string length $engine]]
        }

        if {$query == {}} {
            send_message "$chan :Missing search criteria."
        } else {
            set csv [get_query_results $engine $query]
            process_csv $csv $chan
        }

        return 1;
    }
        send_message "$chan :Try again later."
    return 0
}

putlog "SearXNG Loaded"`
gemlog
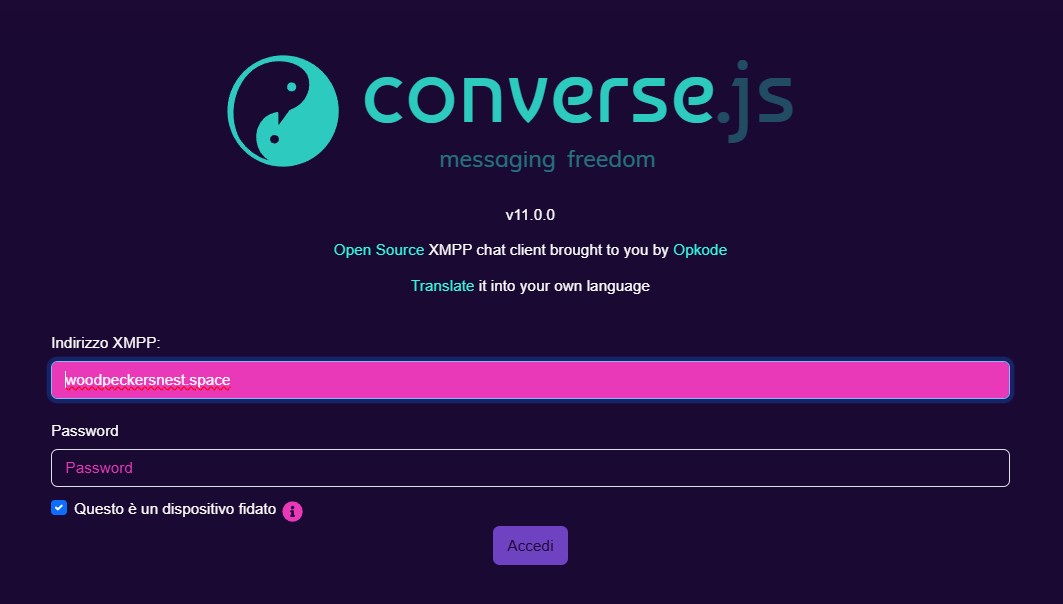
@wpn has got a new HTTP HOST for its XMPP server's..:
- ..web-based chat, powered by converse.js,
- file upload,
- MUCs' pastebin,
- password_reset/invite/registration pages.
Webchat is now located at https://xmpp.woodpeckersnest.space/conversejs - only @wpn accounts can login to it.
In other news, converse.js was recently upgraded and it's now running on the main git branch code, so you can preview the featured "cyberpunk" theme in action, which will be released "soon".
Yet another small update about gemini.
You can now browse gemini://woodpeckersnest.space even from regular HTTP, here: https://gemini.woodpeckersnest.space/
I've applied some fixes (like) to HTML and CSS (the latter is pretty much the same used by the @wpn onboarding page, but obviously customized). As for accessibility, I think it should work well for desktop and also mobile browsers; CGIs work as well.
The proxy I used is Loxy. I also already opened an issue on their repo for a problem with query strings, still waiting for someone to reply. Apart from that, everything checks out.
gemlog
Hello,
just a brief update on gemini here at @wpn.
I switched TLD from ".eu" to ".space": seemed more appropriate for gemini.
gemini://woodpeckersnest.space/
gemlog
I was running 2 separate apps for shell/XMPP account registration at @wpn, so far..
This night I made some changes to the original code (provided by Schimon) and I got just one app with account choice - meaning that you must choose what account type you want in the form. Shell accounts are for friends only, as it's always been.
As a consequence of that, I shut down the old address for XMPP account onboarding and left only the main one, which is:
https://hello.woodpeckersnest.space/
gemlog