IPv6 Certification by Hurricane Electric

Not really that hard of a certification, but still.. Here we are 😀

Not really that hard of a certification, but still.. Here we are 😀
Several months ago I was running a "matrix-docker-ansible" playbook on OVH, but limited resources led me to take it down.
More than one time I thought about reliving that server (which I have backups of), but reading on the changes that the playbook got so far and the difficulties in running a Matrix environment without exposing web ports (80 and 443), I thought to better give up.
Yesterday I looked into Dendrite (a Matrix server written in GO), which looks a lot simpler than the whole lot the docker-ansible playbook offers, so I went ahead and installed it the manual way with nginx as reverse proxy. Easy peasy - documentation is quite good.
Today I also installed "Cinny" as a web client and I'm done for the moment... Federation works, registrations are closed (can invite friends though) and apart from RAM peaks and quite long waiting times when joining rooms (up to 2K members), the server is doing quite well: started with 700MB of RAM (at joining time) and went down to less than 300 in normal usage. CPU gets high spikes when sending messages but other than that is just a few points %. Just don't even think to join the official #matrix room or shit will happen 😀
My new Matrix username is: @roughnecks:woodpeckersnest.space, feel free to add me.
Here are a few tweaks that make my "converse.js" experience better:
Remove link from banner: I accidentally used to click that and be teleported to converse.js official webclient, so I thought it could be misleading for unaware users using my locally hosted version of the software.
Search and replace/remove the href bit in converse.min.js, under the dist directory:
<a class="brand-heading" href="https://conversejs.org" target="_blank" rel="noopener">
In the "converse.min.css" file, search for this string and fill it with the following code to have unread MUCs underlined and colored in red:
.list-item.unread-msgs

.list-item.unread-msgs{font-weight:700; text-decoration: underline red;}
Fix color for toolbar-utilities when in 1:1 chats: find this line in "converse.min.css"
.fas:hover svg{fill:var(--chat-head-color)}
and replace with:
.fas:hover svg{fill:var(--chat-toolbar-btn-color)}
Raise minimum chat text area: find this bit in "converse.min.css"
min-height:var(--chat-textarea-height);
and replace with custom value in pixels, e.g.
min-height:120px;
Set a smaller line height for chats list: find the first occurrence of this code in "converse.min.css"
.conversejs .items-list .list-item
and continue until you find:
height:2.5em
substitute it with something like height:2.0em
Removing a space in quoted reply for "actions" plugin: find the following string in your conversejs/dist/plugins/actions/action.js
return ">" + nick + ' : '
remove the offending space
return ">" + nick + ': '
Changing from :smiley: to :thumbsup: emoji for the "Like" actions plugin function: find the following string in your conversejs/dist/plugins/actions/action.js
actions_reactions: [
                                    {name: 'like', label: 'Like', emoji: ':smiley:', icon_class: 'fa fa-check'},
and replace with:
actions_reactions: [
                                    {name: 'like', label: 'Like', emoji: ':thumbsup:', icon_class: 'fa fa-check'},
Fix background-color for screencast plugin icon: replace the class in row #25 in screencast.js
<button class="plugin-screencast"

<button class="btn"
Today I wanted to install yet another web frontend for the services I host, i.e. mumble-web
I won't bore you with the install details, just know that it's basically JS and you need to install npm modules.. After some processing and a whole lot of deprecation warnings on screen, it finally failed. Then I looked at the logs it left and it was searching for python2!! Went back to the github page and found out the code is from about 3 years ago, with the latest issue being about one guy managing to build the software on Debian 11 with some old NodeJs version..
So, after a bit of disappointment, I delete the whole directory and be done with it. You know, there's no alternatives out there 😟
Now I would like to ask a question to disroot admins: how the hell are you running this junk on your server!? I believe they're using docker, still it's not safe in my opinion to run such old-unmaintained stuff.
I won't be doing that.
I recently moved from OVH to Contabo for my VPS: since setting up everything from scratch looked like a hard challenge, I moved everything using rsync.
Firstly, some preparations:
Then I switched to the OVH shell:
exclude.txt file with all the directory and file I didn't want to move:/boot/
/etc/modules
/etc/fstab
/etc/mtab
/etc/netconfig
/etc/networks
/etc/network/
/etc/ssh/
/etc/cloud/
/etc/cloud-release
/etc/grub.d/
/etc/host.conf
/etc/hostname
/etc/hosts
/etc/hosts.allow
/etc/hosts.deny
/etc/init.d/cloud-config
/etc/init.d/cloud-final
/etc/init.d/cloud-init
/etc/init.d/cloud-init-local
/etc/initramfs-tools/
/etc/default/grub
/etc/default/grub.d/
/etc/kernel/
/etc/kernel-img.conf
/lib/modules/
/lost+found/
/sys/
/proc/
/dev/
/tmp/
/var/cache/
/var/log/journal/
/mnt/
/root/.ssh/
moved it to /root/exclude.txt
stopped all the running services
systemctl stop <service>
now we can begin rsync-ing: you have to have access to the root user on destination VPS
rsync -avzP --exclude-from=/root/exclude.txt / root@CONTABO_IP:/
after that, I edited /etc/fstab to add support for quota, like I had on OVH
then I searched and grepped /etc for my OVH IP address, because I knew it was set somewhere on some config file
grep -r “OVH IP” /etc/*
and substituted it with the new Contabo IP, where necessary.
Finally, I could reboot Contabo:
reboot
Once up & running again, I changed all DNS entries from OVH to Contabo IP.. And waited 😀
Last but not least, I edited etc/hosts manually to reflect the new Domain Name address and also set up the hostname
hostnamectl set-hostname <new-hostname>
Done!
EDIT! A detail I missed to mention is that your destination host's root password will be changed, after rsync-ing, to the one of the source host!!
Radicale è un piccolo ma potente server CalDAV (calendari, elenchi di cose da fare) e CardDAV (contatti), che:
Innanzitutto, assicurarsi che python 3.5 o successivo (si consiglia python ≥ 3.6) sia installato. Sarà poi necessario un web server come Apache o nginx; in questa guida verrà usato nginx e verranno installati pacchetti presenti in Debian, anziché usare "pip".
# apt install radicale apache2-utils python3-passlib
# nano /etc/radicale/config
Cambiare le linee seguenti:
 [server]
 hosts = 127.0.0.1:5232

 [auth]
 type = http_x_remote_user

 [rights]
 type = owner_only
 file = /etc/radicale/rights

 [storage]
 type = multifilesystem_nolock

 [logging]
 level = info
 mask_passwords = True

 [headers]
 Access-Control-Allow-Origin = *
Ora possiamo avviare il servizio:
# systemctl start radicale.service
# systemctl status radicale.service
Per leggere i log, digitare:
# journalctl -xe -u radicale.service
Quando avremo sistemato tutto e Radicale funzionerà correttamente, potremo abilitare il servizio al boot:
# systemctl enable radicale.service
Esempio di configurazione di nginx:
server {
    listen 443 ssl http2;
    server_name cal.woodpeckersnest.space;

    ssl_certificate /etc/letsencrypt/live/cal.woodpeckersnest.space/fullchain.pem;
    ssl_certificate_key /etc/letsencrypt/live/cal.woodpeckersnest.space/privkey.pem;

        error_log /var/log/nginx/radicale.err;
        access_log /var/log/nginx/radicale.log;

        add_header "X-XSS-Protection" "0";

    location / {
        return 301  /radicale/;
    }

    location /radicale/ { # The trailing / is important!
        proxy_pass        http://localhost:5232/; # The / is important!
        proxy_set_header  X-Script-Name /radicale;
        proxy_set_header  X-Forwarded-For $proxy_add_x_forwarded_for;
        proxy_set_header  X-Remote-User $remote_user;
        proxy_set_header  Host $http_host;
        proxy_pass_header Authorization;
        auth_basic        "Radicale - Password Required";
        auth_basic_user_file /etc/nginx/radicale-users;
        }
}

server {
    listen 0.0.0.0:80;
    server_name cal.woodpeckersnest.space;

    location / {
        return 301  /radicale/;
    }

    location /radicale/ {
        return 301 https://$host$request_uri;
    }
}
la riga che recita:
auth_basic_user_file /etc/nginx/radicale-users;
ci indica che dovremmo creare il file a quel percorso con le credenziali degli utenti che vorranno usare il servizio.
Il comando per fare ciò è "htpasswd"
$ htpasswd -c /etc/nginx/radicale-users <nome_utente>
Una volta battuto enter vi verrà chiesta la password per l'utente <nome_utente> che avrete scelto ed il tutto verrà salvato nel file "/etc/nginx/radicale-users". Riavviate nginx per terminare.
Come potete vedere dal file di configurazione nginx, avrete bisogno di un sottodominio DNS e del relativo certificato (tutto ciò non è scopo di questa guida).
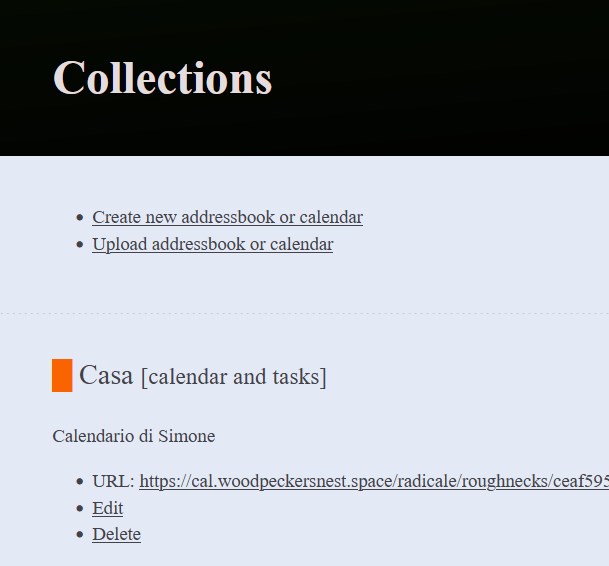
Abbiamo terminato: connettetevi al vostro sottodominio e dovreste poter accedere alla pagina di login di Radicale. Seguendo il file di configurazione nginx, per il mio caso il link sarà il seguente:
https://cal.woodpeckersnest.space/

These days I am tinkering with a Mailing List for Delta Chat powered by mlmmj
I was able to create the list and set up Postfix correctly - instructions are quite clear even if on a couple settings I had to do some troubleshooting looking at logs.. Now I have this Mailing List called deltachat@woodpeckersnest.eu which you can subscribe to by sending an email to deltachat+subscribe@woodpeckersnest.eu and following further instructions.
Initially Delta Chat would create groups of people with the ML's address inside of it, thus splitting every conversation by users participating in it. This was later fixed by adding the following lines in list-dir/control/customheaders file:
X-Mailinglist: deltachat
Reply-To: deltachat@woodpeckersnest.space
List-ID: DC Mailing List <deltachat.woodpeckersnest.eu>
List-Post: <mailto:deltachat@woodpeckersnest.eu>
Now a proper Super Group is created and everyone¹ is able to message in it.
¹ Well, not actually everyone since a member still has issues but I'm positive that can be fixed by chatting again with the ML's address and removing all weird groups created earlier.

This ^ is how the supergroup looks in my chat window - the avatar is only local, it can't be set for every member but the name is the same for everyone.
Then someone "complained" for the lack of anonymity for users email addresses, like it's done in the "official" Delta Chat's MLs.. So I asked on codeberg but it seems to be a missing feature (I'm still waiting for replies 😬).
This is it for now, will keep you posted when/if I have news.
E' attiva da poche ore la nuova community Italiana XMPP-IT.net. Alcuni riferimenti:
Venite a trovarci se conoscete di già XMPP ma soprattutto se non lo conoscete ancora: creare un account è facile e sicuro e se avete qualsiasi dubbio scrivete pure un'email ad "admin@xmpp-it.net" o lasciate un commento nel sito!

Thanks Jc Brand (conversejs developer) for sending me these awesome stickers!!
In XMPP you can have "hats"! A hat is basically a label next to your nickname which can show maybe a role you have in a particolar MUC (e.g. "teacher" for a class, "manager" for an office, or "developer" for a software project and so on..). The relative XEP is https://xmpp.org/extensions/xep-0317.html
The only client where this XEP seems to be manageable, is conversejs: https://m.conversejs.org/docs/html/configuration.html#muc-hats but Cheogram can show hats as well in the participant list.
There are a couple modules needed in prosody and you can install them like so:
prosodyctl install --server=https://modules.prosody.im/rocks/ mod_muc_hats_api
prosodyctl install --server=https://modules.prosody.im/rocks/ mod_muc_hats_adhoc
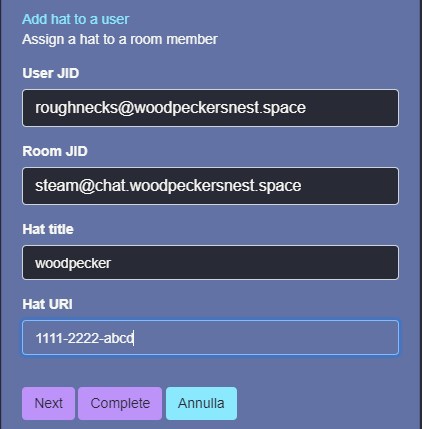
This is the adhoc command in conversejs to set a hat:

You need to specify a user JID, a room JID (on your server), a Hat title (the actual label you want to be shown) and a Hat URI (a machine-readable unique identifier, like 1111-2222-abcd - this is something you make up yourself)
And this is the final outcome
