L'applicazione "photos" della società "ente" è una alternativa alla più rinomata Google Foto, ossia un'app che conserva le vostre immagini (anche chiamate "memories", ricordi) sul cloud. A seconda del profilo scelto potrete immagazzinare tot dati a determinati prezzi - a dire il vero esiste anche un piano di prova per un anno con 1GB di spazio, che naturalmente non soddisferà nessuno.
Da qualche settimana però ente ha deciso di rilasciare come codice aperto la sua versione del server, che può essere liberamente fatto girare sulla propria macchina insieme alle relative app (photos per Android, web app), tramite alcune modifiche alle stesse.
Io e lorenzo @lorenzo@fedi.bobadin.icu ci siamo allora messi in gioco per avere delle istanze personali di ente server ed uno spazio in cloud dove poter caricare il materiale (l'Object Storage S3 che abbiamo utilizzato è totalmente sponsorizzato da lorenzo, il quale ringrazio)
Sin da subito abbiamo avuto diverse difficoltà, perché la documentazione, ahimè, è divisa tra blog e repository github, con molte incosistenze e diverse lacune. Al momento però siamo riusciti ad avere un servizio funzionante con l'app photos; per la parte web invece ci sono ancora alcuni problemi.
In questo post riassumerò le operazioni effettuate.
Lo stack docker per i servizi ente è costituito da:
- server (museum)
- database pgsql
- minio (object storage locale)
- socat
Per utilizzare un S3 locale alla vostra macchina avete bisogno di tutti questi componenti, mentre utilizzando uno storage S3 esterno, basteranno solamente il server museum ed un database (docker o di sistema)
Nella seguente guida parlerò solo di un sistema Debian con database installato localmente (quindi niente immagine docker) e S3 esterno (quindi niente minio/socat)
La guida di riferimento seguita è questa: https://github.com/ente-io/ente/blob/main/server/docs/docker.md e di seguito elencherò solo le modifiche apportate.
Utilizzeremo solo 3 file: compose.yaml e museum.yaml che andranno creati nella directory "ente", come da guida linkata sopra, mentre il percorso per credentials.yaml sarà scripts/compose/credentials.yaml, sempre all'interno della dir base "ente".
compose.yaml
Il file compose.yaml sarà il seguente:
services:
  museum:
    image: ghcr.io/ente-io/server
    restart: always
    network_mode: "host"
    environment:
      # Pass-in the config to connect to the DB and MinIO
      ENTE_CREDENTIALS_FILE: /credentials.yaml
    volumes:
      - custom-logs:/var/logs
      - ./museum.yaml:/museum.yaml:ro
      - ./scripts/compose/credentials.yaml:/credentials.yaml:ro
      - ./data:/data:ro

volumes:
  custom-logs:
Il network è stato cambiato da "internal" ad "host" per permettere al server ente nel contenitore docker di dialogare col database in localhost sul sistema operativo.
La porta esposta sul sistema operativo non può essere modificata con network=host (se avviate il container con qualsiasi porta specificata otterrete un warning - Published ports are discarded when using host network mode), quindi è stata rimossa dal compose.
Assicuratevi che la "8080" non sia già in uso da altri applicativi:
sudo netstat -lnp | grep 8080
museum.yaml
Il file museum.yaml, ridotto all'essenziale (più commenti), sarà il seguente:
# Configuring museum
# ------------------
#
#
# By default, museum logs to stdout when running locally. Specify this path to
# get it to log to a file instead.
#
# It must be specified if running in a non-local environment.
log-file: ""

# HTTP connection parameters
http:
    # If true, bind to 443 and use TLS.
    # By default, this is false, and museum will bind to 8080 without TLS.
    # use-tls: true

# Key used for encrypting customer emails before storing them in DB
#
# To make it easy to get started, some randomly generated values are provided
# here. But if you're really going to be using museum, please generate new keys.
# You can use `go run tools/gen-random-keys/main.go` for that.
key:
    encryption: <chiave>
    hash: <chiave>

# JWT secrets
#
# To make it easy to get started, a randomly generated values is provided here.
# But if you're really going to be using museum, please generate new keys. You
# can use `go run tools/gen-random-keys/main.go` for that.
jwt:
    secret: <chiave>

# SMTP configuration (optional)
#
# Configure credentials here for sending mails from museum (e.g. OTP emails).
#
# The smtp credentials will be used if the host is specified. Otherwise it will
# try to use the transmail credentials. Ideally, one of smtp or transmail should
# be configured for a production instance.
smtp:
    host:
    port:
    username:
    password:

# Various low-level configuration options
internal:
    # If false (the default), then museum will notify the external world of
    # various events. E.g, email users about their storage being full, send
    # alerts to Discord, etc.
    #
    # It can be set to true when running a "read only" instance like a backup
    # restoration test, where we want to be able to access data but otherwise
    # minimize external side effects.
    silent: false
    # If provided, this external healthcheck url is periodically pinged.
    health-check-url:
    # Hardcoded verification codes, useful for logging in when developing.
    #
    # Uncomment this and set these to your email ID or domain so that you don't
    # need to peek into the server logs for obtaining the OTP when trying to log
    # into an instance you're developing on.
    #hardcoded-ott:
    #     emails:
    #         - "example@example.org,123456"
    #     # When running in a local environment, hardcode the verification code to
    #     # 123456 for email addresses ending with @example.org
    #     local-domain-suffix: "@example.org"
    #     local-domain-value: 123456
    # List of user IDs that can use the admin API endpoints.
    admins: []

# Replication config
#
# If enabled, replicate each file to 2 other data centers after it gets
# successfully uploaded to the primary hot storage.
replication:
    enabled: false
    # The Cloudflare worker to use to download files from the primary hot
    # bucket. Must be specified if replication is enabled.
    worker-url:
    # Number of go routines to spawn for replication
    # This is not related to the worker-url above.
    # Optional, default value is indicated here.
    worker-count: 6
    # Where to store temporary objects during replication v3
    # Optional, default value is indicated here.
    tmp-storage: tmp/replication

# Configuration for various background / cron jobs.
jobs:
    cron:
        # Instances run various cleanup, sending emails and other cron jobs. Use
        # this flag to disable all these cron jobs.
        skip: false
    remove-unreported-objects:
        # Number of go routines to spawn for object cleanup
        # Optional, default value is indicated here.
        worker-count: 1
    clear-orphan-objects:
        # By default, this job is disabled.
        enabled: false
        # If provided, only objects that begin with this prefix are pruned.
        prefix: ""

stripe:
    path:
        success: ?status=success&session_id={CHECKOUT_SESSION_ID}
        cancel: ?status=fail&reason=canceled
Come (quasi) scritto nel commento, per generare chiavi e segreto jwt bisognerà clonare in una directory a piacere il server ente, entrare nella directory "server" e semplicemente digitare il comando:
go run tools/gen-random-keys/main.go
La configurazione di queste chiavi, come pure tutta la sezione SMTP è opzionale; se decidete di compilare i campi per smtp, la vostra istanza sarà di fatto aperta alle registrazioni utente, cosa che probabilmente non vorrete fare.
Se decidete di continuare, avrete bisogno di installare "go" in Debian; oppure se siete in fase di test utilizzate le chiavi di default presenti nel file: https://github.com/ente-io/ente/blob/main/server/configurations/local.yaml#L151-L161
sudo apt install golang-1.19-go
Altra dipendenza prima di eseguire il comando è: libsodium
sudo apt install libsodium23:amd64 libsodium-dev:amd64
credentials.yaml
Ultimo file di configurazione è credentials.yaml
db:
    host: localhost
    port: 5432
    name: ente_db
    user: ente
    password: password

s3:
    are_local_buckets: false
    use_path_style_urls: true
    b2-eu-cen:
        key: <key>
        secret: <secret>
        endpoint: link_allo_storage
        region: eu-central-2
        bucket: <bucket_name>
Questo file si compone dei dati del database postgres e dello storage esterno S3: la modifica essenziale per il databse è "host", che andrà impostato su "localhost"; per S3 è importante cambiare solamente "key", "secret", "endpoint" e "bucket"; lasciate gli altri valori intatti o avrete problemi di connessione; da quello che ho capito sono hard-coded.
E' giunta l'ora di creare il database:
sudo su - postgres
psql
CREATE DATABASE ente_db;
CREATE USER ente WITH PASSWORD 'sekret';
GRANT ALL PRIVILEGES ON DATABASE ente_db TO ente;
ALTER DATABASE ente_db OWNER TO ente;
Modificate i nome di db, user e password a piacere (basta che siano uguali a quelli specificati in crednetials.yaml). Battete "enter" ad ogni riga. Postgres risponderà ad ogni comando con una conferma circa le operazioni eseguite.
Per uscire dalla cli di pg:
\quit
Per tornare al vostro utente:
exit
E lanciamo docker:
sudo docker compose up
Controllate i log, l'importante è che il database sia correttamente connesso; comparirà qualche errore in seguito, ma se il server rimane in esecuzione senza fermarsi dovrebbe essere tutto a posto.
Il server rimane in ascolto su localhost, porta 8080.
Per poter raggiungerlo dall'esterno bisognerà configurare un reverse proxy nel vostro web server - Apache, nginx o caddy.
Lascio qui una configurazione di esempio per nginx:
map $http_upgrade $connection_upgrade {
        default upgrade;
        ''      close;
}
server {
    server_name sottodominio.dominio.tld;

    access_log /var/log/nginx/sottodominio/access.log;
    error_log /var/log/nginx/sottodominio/error.log;

    location / {
           proxy_pass http://[::1]:8080;
           proxy_set_header Host $host;
           proxy_set_header X-Real-IP $remote_addr;
           proxy_set_header X-Forwarded-For $proxy_add_x_forwarded_for;
           proxy_set_header X-Forwarded-Proto $scheme;
    }

    listen [::]:443 ssl http2;
    listen 443 ssl http2;
    ssl_certificate /etc/letsencrypt/live/sottodominio.dominio.tld/fullchain.pem;
    ssl_certificate_key /etc/letsencrypt/live/sottodominio.dominio.tld/privkey.pem;
}
La mia configurazione prevede supporto a IPv6; in caso voleste usare solamente IPv4, cambiate l'host in proxy_pass e togliete il listen [::]:443 ssl http2;
Ora, scaricate l'app ente photos dal loro repository github, poiché quella sul Play Store non è stata ancora aggiornata coi cambiamenti necessari al funzionamento su server self-hosted.
Avviata l'app sul telefono, tappate 7 o più volte in rapida successione sulla schermata di avvio finché non apparirà un campo di testo: riempitelo con l'indirizzo che avete configurato per il reverse proxy:
https://sottodominio.dominio.tld
Connettete e dovreste vedere un messaggio di conferma se tutto è andato bene, con sotto scritto l'indirizzo a cui siete collegati.
Una volta nell'app dovrete registrare un account. Inserite email e password ed alla schermata successiva vi verrà chiesto un codice OTP di conferma. L'app vi dirà che il codice è stato inviato alla vostra casella email, ma questo è vero solo nel caso abbiate impostato i campi per SMTP, come spiegato sopra (altra cosa da sapere è che il mittente delle email è ente <verification@ente.io>, quindi non vi spaventate). In caso contrario il codice OTP può essere recuperato facilmente dai log docker che staranno scorrendo nel terminale. verrà scritto qualcosa come "OTT per id sfilza di caratteri: e qui un codice di 6 cifre".
Ricopiatelo nell'app e proseguite.
Dopo alcuni istanti per il setup della crittografia arriverà una schermata con una passphrase che dovrete conservare in luogo sicuro, per il ripristino dell'account in caso di perdita della password di accesso.
Scegliete ora le cartelle sul vostro telefono di cui fare backup e cominciate!
Se lo storage è connesso correttamente vedrete i vostri ricordi in caricamento con un numero progressivo; in caso contario, se qualcosa non sta funzionando, sulle vostre foto rimarrà una nuvoletta barrata, che indica il mancato caricamento. Se questo fosse il caso, andate di nuovo a leggere i log del container per eventuali errori.
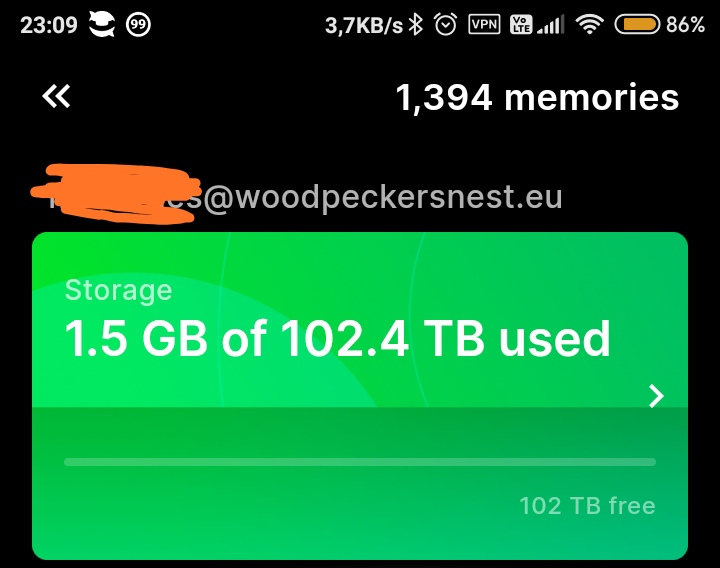
Sbloccare il limite di 1GB su profilo di prova
Nonostante stiamo usando un server personale, noterete che l'app photos mostra ancora i profili/sottoscrizioni a pagamento dell'app originale.
Per poter sbloccare lo storage pressoché infinito, dopo aver selezionato il profilo di prova ad 1GB, bisognerà utilizzare uno strumento a riga di comando - ente cli.
E' necessario installare alcuni pacchetti, generalmente utilizzati in versione Linux Desktop e lanciare alcuni comandi per attivare la "secret service dbus interface", necessaria alla cli ente.
sudo apt install gnome-keyring libsecret-1-0 dbus-x11
Eseguite questi comandi, copio incollo perché è inutile soffermarsi oltre:
eval "$(dbus-launch --sh-syntax)"

mkdir -p ~/.cache
mkdir -p ~/.local/share/keyrings # where the automatic keyring is created

# 1. Create the keyring manually with a dummy password in stdin
eval "$(printf '\n' | gnome-keyring-daemon --unlock)"

# 2. Start the daemon, using the password to unlock the just-created keyring:
eval "$(printf '\n' | /usr/bin/gnome-keyring-daemon --start)"
A questo punto l'ambiente è pronto.
Scaricate ente cli dal repository github: https://github.com/ente-io/ente/releases/tag/cli-v0.1.13
Nel nostro caso, per Debian x64, scaricheremo: https://github.com/ente-io/ente/releases/download/cli-v0.1.13/ente-cli-v0.1.13-linux-amd64.tar.gz
Estraete il contenuto della "tarpalla" in una directory a piacere, magari in ~/bin
Dentro alla stessa directory, create un file chiamato config.yaml, contenente le seguenti righe:
endpoint:
    api: "http://localhost:8080"
Dalla stessa directory, lanciamo ./ente help per verificarne il corretto funzionamento e.. leggere l'help 😀
Per prima cosa aggiungiamo il nostro utente creato precedentemente:
./ente account add
Vi verrano chieste alcune info, in particolare indirizzo email con cui vi siete registrati su photos, relativa password e una dir dove poter esportare le vostre immagini (la dir deve esistere prima di poterla specificare).
Una volta aggiunto l'account, digitate:
./ente account list
E dovreste vedere le info del vostro account, tra le quali un "ID". Copiatelo ed aprite nuovamente il file "museum.yaml" visto in precedenza. In questa sezione modificate la voce "admins" inserendo tra le parentesi quadre l'ID utente copiato. Salvate e riavviate il contenitore docker; da questo momento siete admin dell'istanza.
internal:
    # If false (the default), then museum will notify the external world of
    # various events. E.g, email users about their storage being full, send
    # alerts to Discord, etc.
    #
    # It can be set to true when running a "read only" instance like a backup
    # restoration test, where we want to be able to access data but otherwise
    # minimize external side effects.
    silent: false
    # If provided, this external healthcheck url is periodically pinged.
    health-check-url:
    # Hardcoded verification codes, useful for logging in when developing.
    #
    # Uncomment this and set these to your email ID or domain so that you don't
    # need to peek into the server logs for obtaining the OTP when trying to log
    # into an instance you're developing on.
    #hardcoded-ott:
    #     emails:
    #         - "example@example.org,123456"
    #     # When running in a local environment, hardcode the verification code to
    #     # 123456 for email addresses ending with @example.org
    #     local-domain-suffix: "@example.org"
    #     local-domain-value: 123456
    # List of user IDs that can use the admin API endpoints.
    admins: []
Torniamo alla cli:
./ente admin list-users
Dovreste vedere voi stessi e leggere che siete effettivamente admin.
Ultimo comando per sbloccare lo storage da 100TB e abbiamo finito:
./ente admin update-subscription -u email@vostrodominio.tld --no-limit true